线性代数:赋予图像灵魂的数学语言CKVision SDK中的线性代数实战指南
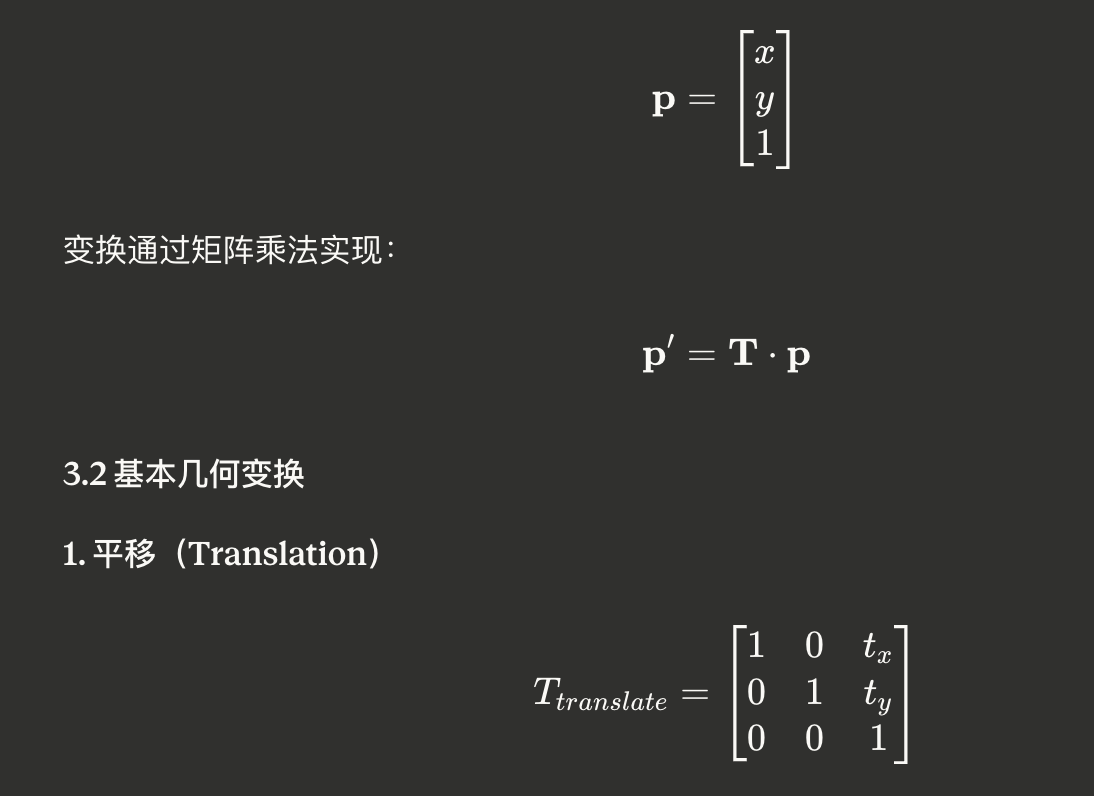
在数字时代,当我们凝视屏幕上一幅绚丽多彩的照片时,我们看到的不仅仅是风景,而是一场宏大的线性代数运算。从17世纪的方程组研究到现代的深度学习,线性代数已经演变成了描述、处理和理解图像的通用语言。
引言
在数字时代,当我们凝视屏幕上一幅绚丽多彩的照片时,我们看到的不仅仅是风景,而是一场宏大的线性代数运算。从17世纪的方程组研究到现代的深度学习,线性代数已经演变成了描述、处理和理解图像的通用语言。
本文将深入探讨线性代数在CKVision SDK中的实际应用,展示如何用数学之美驱动工业视觉检测。

一、溯源:从行列式到矩阵运算
1.1 数学发展简史
奠基时代(17-18世纪)
- 莱布尼茨(1693):首次提出行列式概念
- 欧拉(1750):系统化线性方程组解法
- 拉格朗日(1770):发展线性运算规则
系统化时代(19世纪)
- 阿瑟·凯莱(1858):发表《矩阵理论的回忆录》,正式定义矩阵乘法
- 西尔维斯特(1850):创造"matrix"(矩阵)术语
- 高斯(1810):发明高斯消元法
无限维时代(20世纪)
- 希尔伯特(1906):将线性代数推广至无限维空间
- 冯·诺依曼(1930s):发展算子理论,应用于量子力学
1.2 从数学到工业视觉
在CKVision SDK中,这些数学理论转化为实用的工具类:
|
数学概念 |
CKVision类库 |
功能 |
|
矩阵 |
CKMat2D |
二维矩阵运算 |
|
线性变换 |
CKImgTrans |
图像几何变换 |
|
线性运算 |
CKImgOpera |
算术和逻辑运算 |
|
卷积 |
CKImgFilter |
滤波处理 |
|
坐标变换 |
CKFrameTrans |
坐标系转换 |
二、图像的本质:矩阵的数字化表达
2.1 图像即矩阵
在CKVision中,图像被表示为矩阵:

2.2 CKImage:矩阵的实际载体
#include "CKBase.h"
// 示例1:创建和访问图像矩阵
void ImageAsMatrix()
{
// 初始化SDK
CKVision::InitLibrary();
// 创建图像对象(矩阵容器)
CKVision::CKImage image;
// 创建640×480的8位灰度图像
image.Create(640, 480, 8); // 相当于创建480×640矩阵
int width = image.GetWidth(); // N = 640
int height = image.GetHeight(); // M = 480
int depth = image.GetDepth(); // 8位或16位
// 访问矩阵元素I(i,j)
for (int i = 0; i < height; i++) // 行
{
unsigned char* row_ptr = image.GetLineAddr(i);
for (int j = 0; j < width; j++) // 列
{
// 读取元素
unsigned char pixel = row_ptr[j];
// 修改元素(矩阵运算)
row_ptr[j] = pixel > 128 ? 255 : 0; // 二值化
}
}
// 保存图像
image.SaveToFile("binary_image.bmp");
CKVision::ExitLibrary();
}
// 示例2:RGB三通道的线性组合
void RGBToGrayConversion()
{
CKVision::InitLibrary();
CKVision::CKImage rgb_image, gray_image;
rgb_image.LoadFromFile("color_photo.bmp");
// CKImgConve类实现了标准的线性组合公式
// Gray = 0.299*R + 0.587*G + 0.114*B
CKImgConve::RGBToGray(rgb_image, gray_image);
gray_image.SaveToFile("gray_photo.bmp");
CKVision::ExitLibrary();
}
// 示例3:多图像的线性组合
void ImageLinearCombination()
{
CKVision::InitLibrary();
CKVision::CKImage img1, img2, result;
img1.LoadFromFile("image1.bmp");
img2.LoadFromFile("image2.bmp");
// 线性组合:result = 0.7*img1 + 0.3*img2
// 实现图像融合效果
CKVision::CKImage weighted1, weighted2;
// img1 * 0.7
CKImgOpera::MulConst(img1, 0.7, weighted1);
// img2 * 0.3
CKImgOpera::MulConst(img2, 0.3, weighted2);
// 相加
CKImgOpera::Add(weighted1, weighted2, result);
result.SaveToFile("blended_image.bmp");
CKVision::ExitLibrary();
}
三、几何变换:空间的线性舞蹈
3.1 数学基础:齐次坐标与变换矩阵
在二维图像中,使用齐次坐标表示点:
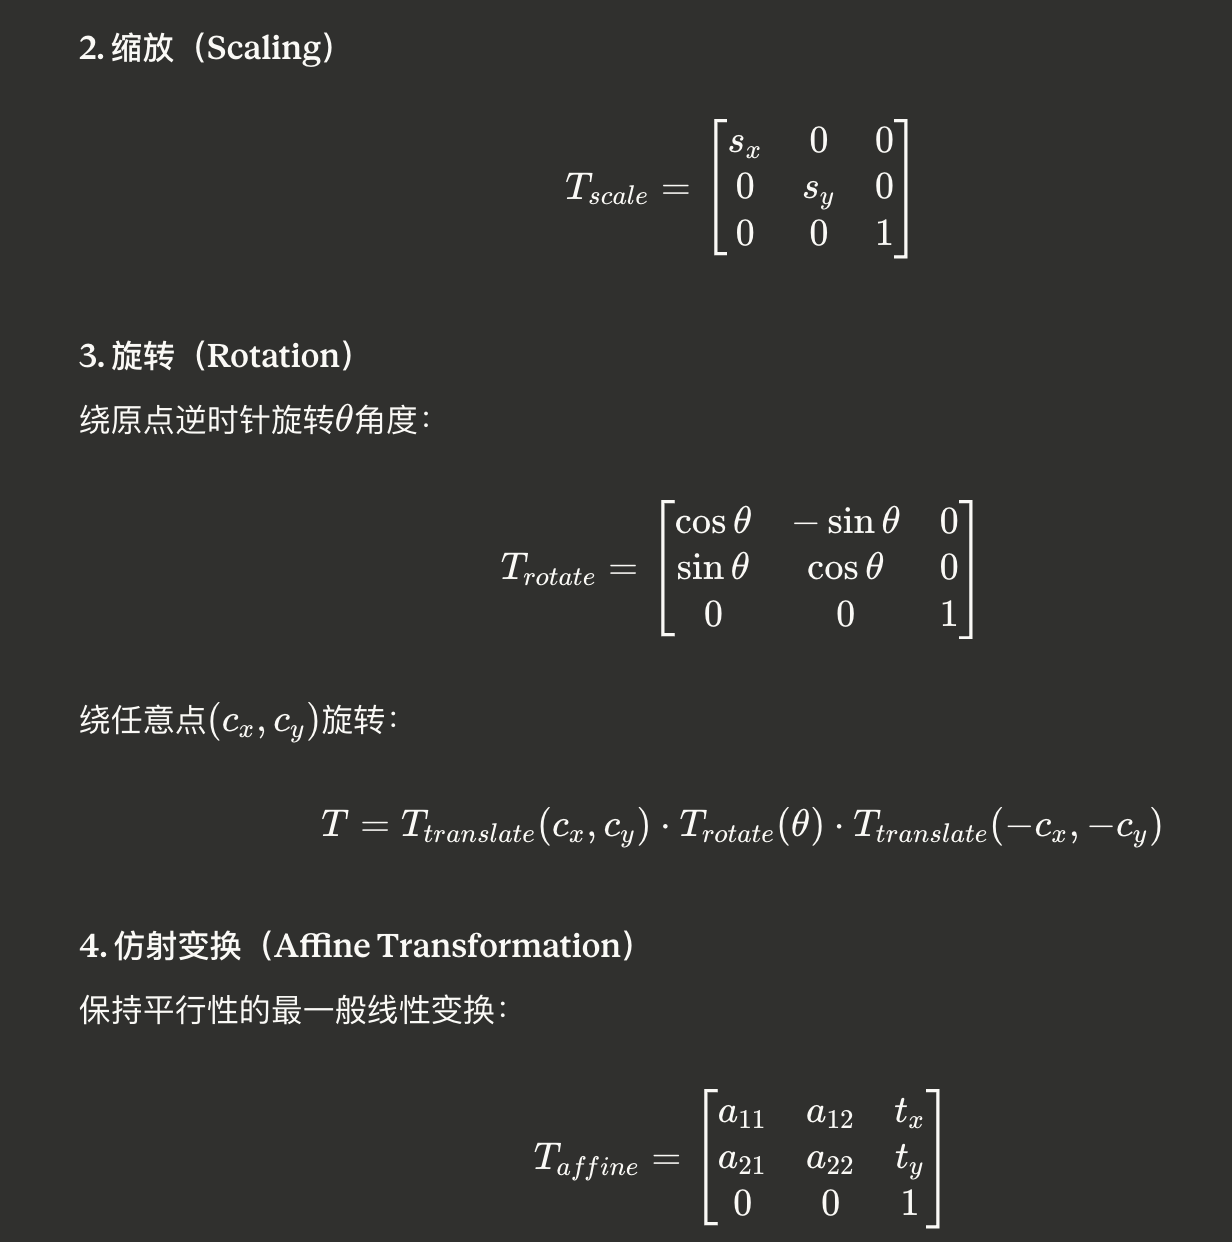
通过3对对应点唯一确定。
5. 透视变换(Perspective Transformation)
更一般的投影变换:

通过4对对应点唯一确定,应用于梯形校正。
3.3 CKImgTrans:几何变换类库
#include "CKBase.h"
// 示例1:图像旋转
void RotateImage()
{
CKVision::InitLibrary();
CKVision::CKImage src, dst;
src.LoadFromFile("original.bmp");
// 定义旋转中心(通常是图像中心)
float center_x = src.GetWidth() / 2.0f;
float center_y = src.GetHeight() / 2.0f;
float angle = 45.0f; // 旋转45度
// CKImgTrans内部构造旋转矩阵并应用
// 数学过程:
// 1. 平移到原点:T1 = [1 0 -cx; 0 1 -cy; 0 0 1]
// 2. 旋转:R = [cos θ -sin θ 0; sin θ cos θ 0; 0 0 1]
// 3. 平移回去:T2 = [1 0 cx; 0 1 cy; 0 0 1]
// 4. 总变换:T = T2 * R * T1
CKImgTrans::Rotate(src, dst, center_x, center_y, angle);
dst.SaveToFile("rotated_45deg.bmp");
CKVision::ExitLibrary();
}
// 示例2:图像缩放
void ScaleImage()
{
CKVision::InitLibrary();
CKVision::CKImage src, dst;
src.LoadFromFile("high_res.bmp");
int new_width = src.GetWidth() * 0.5; // 宽度缩小50%
int new_height = src.GetHeight() * 0.5; // 高度缩小50%
// 内部应用缩放矩阵:
// S = [sx 0 0; 0 sy 0; 0 0 1]
// 其中 sx = new_width/old_width, sy = new_height/old_height
CKImgTrans::Resize(src, dst, new_width, new_height);
dst.SaveToFile("scaled_image.bmp");
CKVision::ExitLibrary();
}
// 示例3:镜像翻转(特殊的线性变换)
void FlipImage()
{
CKVision::InitLibrary();
CKVision::CKImage src, dst_h, dst_v;
src.LoadFromFile("photo.bmp");
// 水平翻转(关于Y轴对称)
// 变换矩阵:[-1 0 width; 0 1 0; 0 0 1]
CKImgTrans::FlipHorizontal(src, dst_h);
// 垂直翻转(关于X轴对称)
// 变换矩阵:[1 0 0; 0 -1 height; 0 0 1]
CKImgTrans::FlipVertical(src, dst_v);
dst_h.SaveToFile("flipped_h.bmp");
dst_v.SaveToFile("flipped_v.bmp");
CKVision::ExitLibrary();
}
// 示例4:仿射变换(工业应用)
void AffineTransformCorrection()
{
CKVision::InitLibrary();
CKVision::CKImage src, dst;
src.LoadFromFile("skewed_pcb.bmp"); // 倾斜的PCB板图像
// 定义三对对应点(源点→目标点)
// 通过标准定位孔或特征点获得
float src_points[6] = {
100, 50, // 点1
500, 80, // 点2
120, 400 // 点3
};
float dst_points[6] = {
100, 50, // 点1(目标位置)
500, 50, // 点2(矫正后水平)
100, 400 // 点3(矫正后垂直)
};
// CKImgTrans内部求解仿射矩阵:
// 构建线性方程组 Ax = b
// 其中A由源点坐标构成,b由目标点坐标构成
// 通过最小二乘法求解6个未知参数
CKImgTrans::AffineTransform(src, dst, src_points, dst_points);
dst.SaveToFile("corrected_pcb.bmp");
CKVision::ExitLibrary();
}
// 示例5:透视变换(文档扫描校正)
void PerspectiveCorrection()
{
CKVision::InitLibrary();
CKVision::CKImage src, dst;
src.LoadFromFile("document_photo.bmp"); // 倾斜拍摄的文档
// 检测文档四个角点(通过边缘检测或轮廓检测)
float src_corners[8] = {
50, 30, // 左上
450, 80, // 右上
40, 380, // 左下
460, 420 // 右下(透视变形的梯形)
};
// 目标是标准矩形
float dst_corners[8] = {
0, 0, // 左上
400, 0, // 右上
0, 400, // 左下
400, 400 // 右下
};
// 求解透视变换矩阵(3×3矩阵,8个自由度)
// 需要4对点对应关系建立8个方程
// 通过直接线性变换(DLT)算法求解
CKImgTrans::PerspectiveTransform(src, dst,
src_corners, dst_corners);
dst.SaveToFile("rectified_document.bmp");
CKVision::ExitLibrary();
}
// 示例6:变换组合(复杂运动模拟)
void CombinedTransformation()
{
CKVision::InitLibrary();
CKVision::CKImage src, temp1, temp2, final;
src.LoadFromFile("part.bmp");
float cx = src.GetWidth() / 2.0f;
float cy = src.GetHeight() / 2.0f;
// 变换序列(矩阵乘法从右到左):
// T_total = T_translate * T_rotate * T_scale
// 步骤1:缩放 150%
CKImgTrans::Resize(src, temp1,
src.GetWidth() * 1.5,
src.GetHeight() * 1.5);
// 步骤2:旋转 30度
CKImgTrans::Rotate(temp1, temp2, cx, cy, 30.0f);
// 步骤3:平移 (50, 50)
// 通过仿射变换实现
float src_pts[6] = {0, 0, 100, 0, 0, 100};
float dst_pts[6] = {50, 50, 150, 50, 50, 150};
CKImgTrans::AffineTransform(temp2, final, src_pts, dst_pts);
final.SaveToFile("transformed_part.bmp");
// 注意:变换顺序很重要!
// 旋转→缩放→平移 与 平移→旋转→缩放 结果不同
// 因为矩阵乘法不满足交换律
CKVision::ExitLibrary();
}
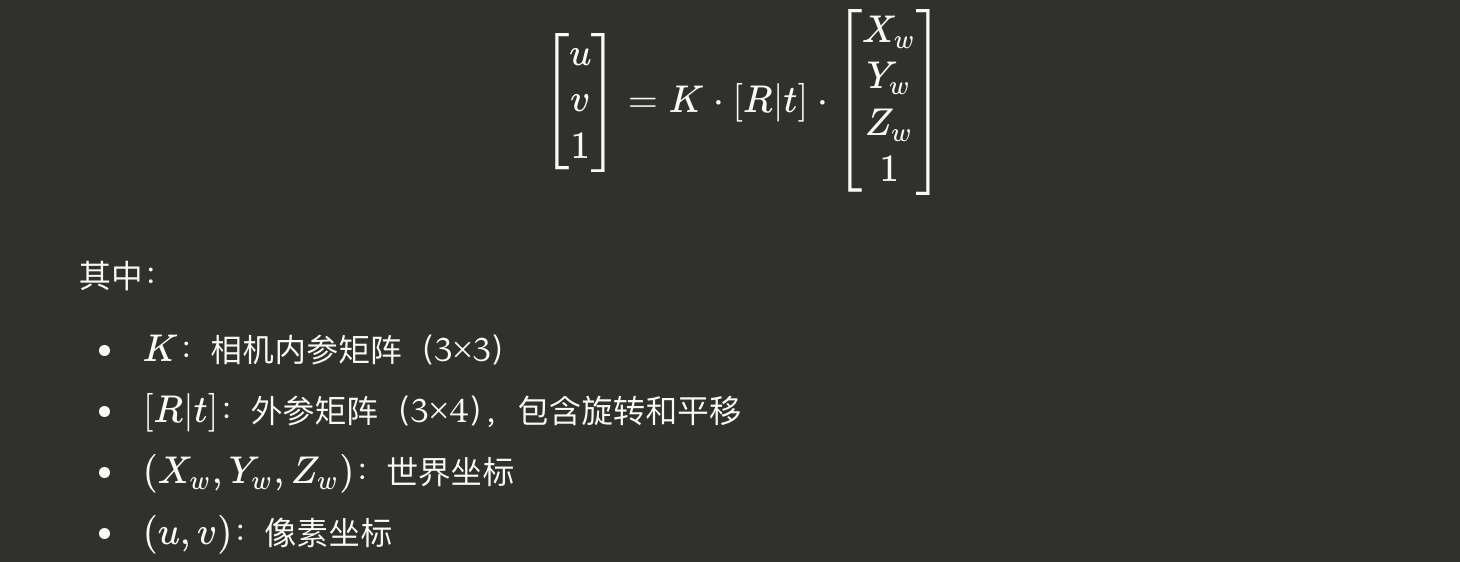
3.4 相机标定:从像素到世界坐标
相机成像的数学模型:
// 示例:相机标定与畸变校正
void CameraCalibrationDemo()
{
CKVision::InitLibrary();
// 1. 使用标定板(棋盘格或圆点阵列)
CKVision::CKChessboard chessboard;
// 设置标定板参数
chessboard.SetPatternSize(9, 6); // 9×6内角点
chessboard.SetSquareSize(25.0f); // 方格边长25mm
// 2. 采集多张不同角度的标定板图像(通常15-20张)
std::vector<CKVision::CKImage> calib_images;
for (int i = 0; i < 15; i++)
{
CKVision::CKImage img;
char filename[64];
sprintf(filename, "calib_%02d.bmp", i);
img.LoadFromFile(filename);
calib_images.push_back(img);
}
// 3. 执行标定
CKVision::CKImageCalib calibrator;
calibrator.SetImages(calib_images);
if (calibrator.Calibrate())
{
printf("Calibration successful!\n");
// 4. 获取相机内参矩阵 K
// K = [fx 0 cx]
// [0 fy cy]
// [0 0 1]
float camera_matrix[9];
calibrator.GetCameraMatrix(camera_matrix);
printf("Camera Matrix:\n");
printf("[%.2f %.2f %.2f]\n",
camera_matrix[0], camera_matrix[1], camera_matrix[2]);
printf("[%.2f %.2f %.2f]\n",
camera_matrix[3], camera_matrix[4], camera_matrix[5]);
printf("[%.2f %.2f %.2f]\n",
camera_matrix[6], camera_matrix[7], camera_matrix[8]);
// 5. 获取畸变系数
float distortion[5]; // k1, k2, p1, p2, k3
calibrator.GetDistortionCoeffs(distortion);
// 6. 应用畸变校正
CKVision::CKImage distorted, corrected;
distorted.LoadFromFile("raw_image.bmp");
calibrator.Undistort(distorted, corrected);
corrected.SaveToFile("undistorted_image.bmp");
// 7. 像素坐标转世界坐标(已知Z坐标)
float pixel_x = 320, pixel_y = 240;
float world_z = 500.0f; // 物体距离相机500mm
float world_x, world_y;
calibrator.PixelToWorld(pixel_x, pixel_y, world_z,
world_x, world_y);
printf("Pixel (%.1f, %.1f) -> World (%.2f, %.2f, %.2f)\n",
pixel_x, pixel_y, world_x, world_y, world_z);
}
CKVision::ExitLibrary();
}
四、矩阵运算:CKMat2D的力量
4.1 矩阵基础运算
CKMat2D类提供了完整的矩阵运算功能:
#include "CKBase.h"
// 示例:矩阵基本运算
void MatrixBasicOperations()
{
CKVision::InitLibrary();
// 创建矩阵
CKVision::CKMat2D A, B, C;
A.Create(3, 3); // 3×3矩阵
B.Create(3, 3);
// 填充矩阵
// A = [1 2 3]
// [4 5 6]
// [7 8 9]
for (int i = 0; i < 3; i++)
{
for (int j = 0; j < 3; j++)
{
A.SetValue(i, j, i * 3 + j + 1);
B.SetValue(i, j, (i + j) * 1.0f);
}
}
// 矩阵加法:C = A + B
C.Create(3, 3);
A.Add(B, C);
// 矩阵减法:C = A - B
A.Subtract(B, C);
// 矩阵乘法:C = A * B
A.Multiply(B, C);
// 数乘:C = k * A
float k = 2.5f;
A.MultiplyScalar(k, C);
// 转置:C = A^T
A.Transpose(C);
// 行列式(仅方阵)
float det = A.Determinant();
printf("det(A) = %.2f\n", det);
// 逆矩阵:C = A^(-1)
if (A.Inverse(C))
{
printf("Inverse matrix computed successfully\n");
// 验证:A * A^(-1) = I
CKVision::CKMat2D identity;
A.Multiply(C, identity);
// 应该得到单位矩阵
printf("A * A^(-1) =\n");
for (int i = 0; i < 3; i++)
{
for (int j = 0; j < 3; j++)
{
printf("%.2f ", identity.GetValue(i, j));
}
printf("\n");
}
}
CKVision::ExitLibrary();
}
4.2 特征值分解与SVD
// 示例:特征值分解与奇异值分解
void MatrixDecomposition()
{
CKVision::InitLibrary();
// 创建对称矩阵(协方差矩阵)
CKVision::CKMat2D A;
A.Create(3, 3);
// A = [4 1 1]
// [1 3 1]
// [1 1 2]
A.SetValue(0, 0, 4.0f); A.SetValue(0, 1, 1.0f); A.SetValue(0, 2, 1.0f);
A.SetValue(1, 0, 1.0f); A.SetValue(1, 1, 3.0f); A.SetValue(1, 2, 1.0f);
A.SetValue(2, 0, 1.0f); A.SetValue(2, 1, 1.0f); A.SetValue(2, 2, 2.0f);
// 特征值分解:A = V * Λ * V^T
CKVision::CKMat2D eigenvalues, eigenvectors;
if (A.EigenDecomposition(eigenvalues, eigenvectors))
{
printf("Eigenvalues:\n");
for (int i = 0; i < 3; i++)
{
printf("λ%d = %.4f\n", i+1, eigenvalues.GetValue(i, 0));
}
printf("\nEigenvectors (columns):\n");
for (int i = 0; i < 3; i++)
{
for (int j = 0; j < 3; j++)
{
printf("%.4f ", eigenvectors.GetValue(i, j));
}
printf("\n");
}
}
// 奇异值分解:A = U * Σ * V^T
CKVision::CKMat2D B;
B.Create(4, 3); // 非方阵
// 填充数据
for (int i = 0; i < 4; i++)
{
for (int j = 0; j < 3; j++)
{
B.SetValue(i, j, (i + 1) * (j + 1) * 1.0f);
}
}
CKVision::CKMat2D U, S, VT;
if (B.SVD(U, S, VT))
{
printf("\nSVD Decomposition:\n");
printf("U: %d × %d\n", U.GetRows(), U.GetCols());
printf("Σ: %d × %d\n", S.GetRows(), S.GetCols());
printf("V^T: %d × %d\n", VT.GetRows(), VT.GetCols());
printf("\nSingular values:\n");
int num_sv = std::min(B.GetRows(), B.GetCols());
for (int i = 0; i < num_sv; i++)
{
printf("σ%d = %.4f\n", i+1, S.GetValue(i, i));
}
}
CKVision::ExitLibrary();
}
4.3 应用:图像压缩(基于SVD)
// 应用示例:基于SVD的图像压缩
void ImageCompressionSVD()
{
CKVision::InitLibrary();
CKVision::CKImage original;
original.LoadFromFile("high_resolution.bmp");
int width = original.GetWidth();
int height = original.GetHeight();
// 1. 将图像转为矩阵
CKVision::CKMat2D image_matrix;
image_matrix.Create(height, width);
for (int i = 0; i < height; i++)
{
unsigned char* row = original.GetLineAddr(i);
for (int j = 0; j < width; j++)
{
image_matrix.SetValue(i, j, (float)row[j]);
}
}
// 2. SVD分解
CKVision::CKMat2D U, S, VT;
image_matrix.SVD(U, S, VT);
// 3. 低秩近似(保留前k个奇异值)
int k = 50; // 压缩参数
printf("Original matrix: %d × %d\n", height, width);
printf("Retaining top %d singular values\n", k);
// 4. 重构图像:A_k = U_k * Σ_k * V_k^T
CKVision::CKMat2D compressed_matrix;
compressed_matrix.Create(height, width);
for (int i = 0; i < height; i++)
{
for (int j = 0; j < width; j++)
{
float sum = 0;
for (int idx = 0; idx < k; idx++)
{
sum += U.GetValue(i, idx) *
S.GetValue(idx, idx) *
VT.GetValue(idx, j);
}
compressed_matrix.SetValue(i, j, sum);
}
}
// 5. 转回图像
CKVision::CKImage compressed;
compressed.Create(width, height, 8);
for (int i = 0; i < height; i++)
{
unsigned char* row = compressed.GetLineAddr(i);
for (int j = 0; j < width; j++)
{
float value = compressed_matrix.GetValue(i, j);
value = std::max(0.0f, std::min(255.0f, value));
row[j] = (unsigned char)value;
}
}
compressed.SaveToFile("compressed_svd.bmp");
// 6. 计算压缩比和误差
int original_size = height * width;
int compressed_size = k * (height + width + 1);
float compression_ratio = (float)original_size / compressed_size;
// 计算PSNR(峰值信噪比)
double mse = 0;
for (int i = 0; i < height; i++)
{
unsigned char* orig_row = original.GetLineAddr(i);
unsigned char* comp_row = compressed.GetLineAddr(i);
for (int j = 0; j < width; j++)
{
double diff = orig_row[j] - comp_row[j];
mse += diff * diff;
}
}
mse /= (height * width);
double psnr = 10 * log10(255.0 * 255.0 / mse);
printf("\nCompression Results:\n");
printf("Compression ratio: %.2fx\n", compression_ratio);
printf("PSNR: %.2f dB\n", psnr);
printf("Retained singular values: %d / %d\n",
k, std::min(height, width));
CKVision::ExitLibrary();
}
五、滤波器:卷积的线性本质
5.1 卷积的数学定义
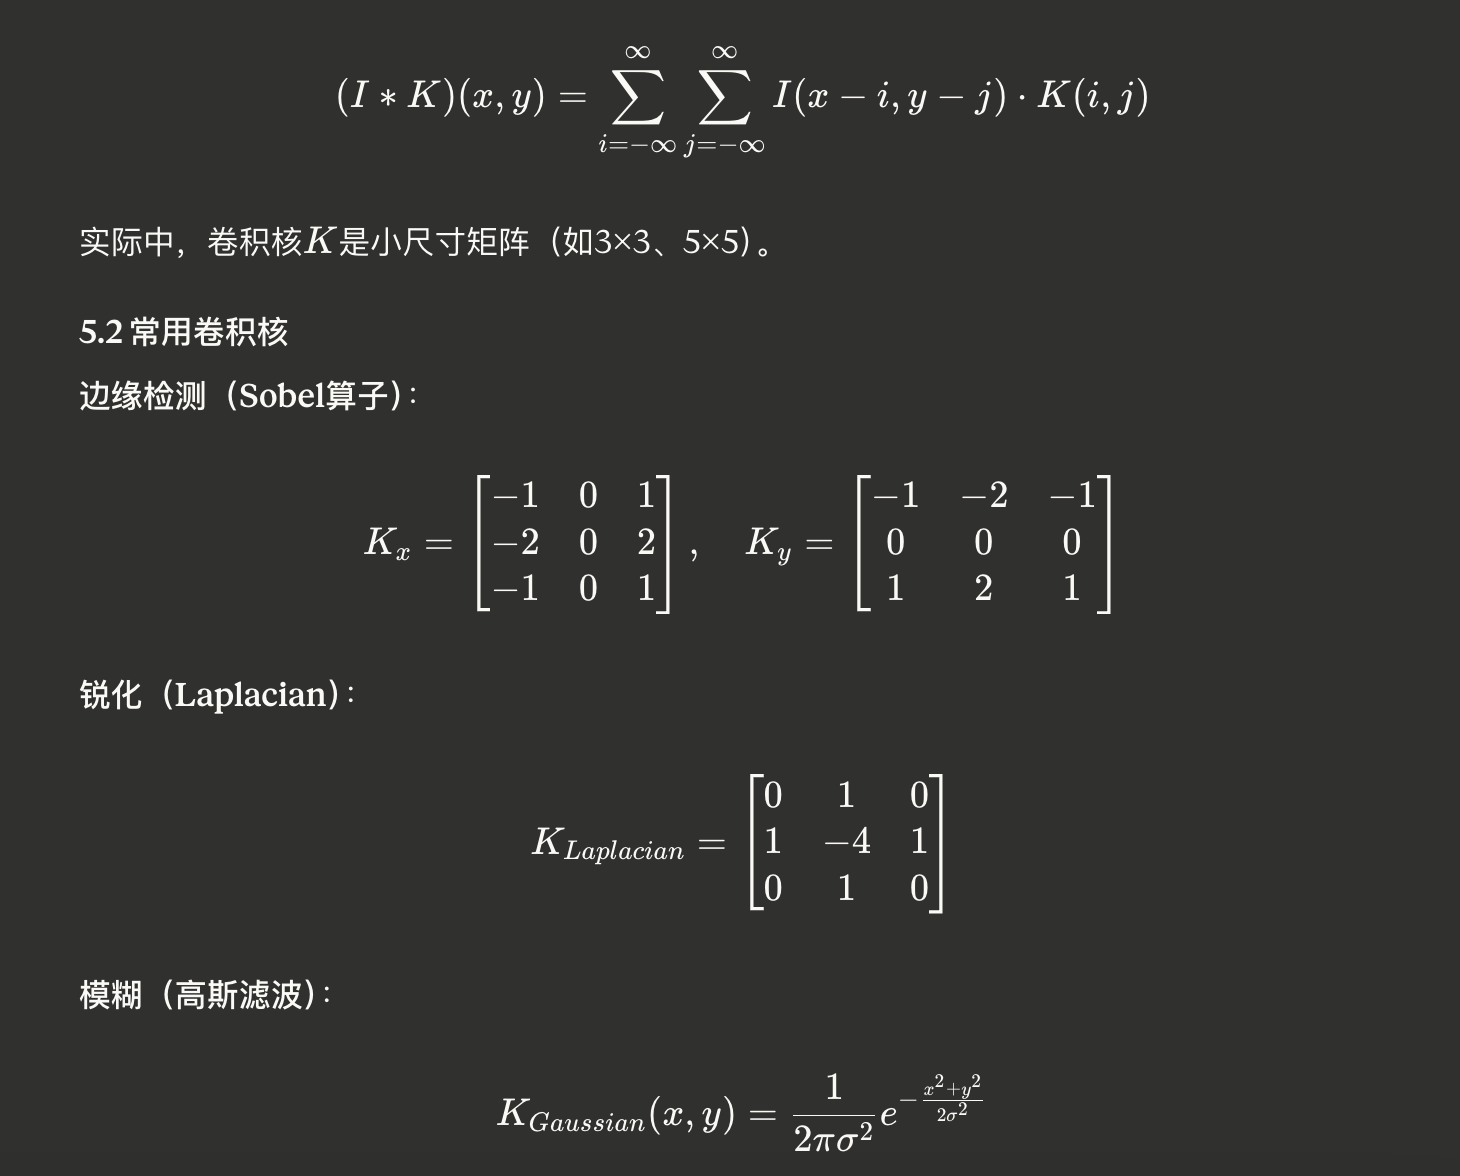
5.3 CKImgFilter:滤波类库
#include "CKBase.h"
// 示例1:边缘检测(Sobel算子)
void SobelEdgeDetection()
{
CKVision::InitLibrary();
CKVision::CKImage src, grad_x, grad_y, gradient;
src.LoadFromFile("part.bmp");
// X方向梯度(垂直边缘)
// 卷积核:Kx = [-1 0 1; -2 0 2; -1 0 1]
CKImgFilter::Sobel(src, grad_x, 1, 0, 3); // dx=1, dy=0, ksize=3
// Y方向梯度(水平边缘)
// 卷积核:Ky = [-1 -2 -1; 0 0 0; 1 2 1]
CKImgFilter::Sobel(src, grad_y, 0, 1, 3);
// 计算梯度幅值:|G| = sqrt(Gx^2 + Gy^2)
gradient.Create(src.GetWidth(), src.GetHeight(), 8);
for (int y = 0; y < src.GetHeight(); y++)
{
unsigned char* px = grad_x.GetLineAddr(y);
unsigned char* py = grad_y.GetLineAddr(y);
unsigned char* pg = gradient.GetLineAddr(y);
for (int x = 0; x < src.GetWidth(); x++)
{
float gx = (float)px[x] - 128; // Sobel输出是有符号的
float gy = (float)py[x] - 128;
float mag = sqrt(gx*gx + gy*gy);
pg[x] = (unsigned char)std::min(255.0f, mag);
}
}
grad_x.SaveToFile("sobel_x.bmp");
grad_y.SaveToFile("sobel_y.bmp");
gradient.SaveToFile("sobel_magnitude.bmp");
CKVision::ExitLibrary();
}
// 示例2:高斯模糊(降噪)
void GaussianBlur()
{
CKVision::InitLibrary();
CKVision::CKImage noisy, smooth;
noisy.LoadFromFile("noisy_image.bmp");
// 高斯模糊
// kernel_size: 卷积核大小(奇数)
// sigma: 标准差,控制模糊程度
int kernel_size = 5;
float sigma = 1.5f;
// CKImgFilter使用可分离卷积优化:
// 2D高斯核 = 1D高斯核(行)× 1D高斯核(列)
// 复杂度从 O(N²·W·H) 降至 O(N·W·H)
CKImgFilter::GaussianBlur(noisy, smooth, kernel_size, sigma);
smooth.SaveToFile("gaussian_smoothed.bmp");
CKVision::ExitLibrary();
}
// 示例3:均值滤波
void MeanFilter()
{
CKVision::InitLibrary();
CKVision::CKImage src, dst;
src.LoadFromFile("image.bmp");
// 均值滤波:用邻域像素的平均值替换中心像素
// 卷积核:K = (1/9) * [1 1 1; 1 1 1; 1 1 1]
int kernel_size = 3;
CKImgFilter::BoxFilter(src, dst, kernel_size);
dst.SaveToFile("mean_filtered.bmp");
CKVision::ExitLibrary();
}
// 示例4:中值滤波(非线性,但基于邻域)
void MedianFilter()
{
CKVision::InitLibrary();
CKVision::CKImage salt_pepper, denoised;
salt_pepper.LoadFromFile("salt_pepper_noise.bmp");
// 中值滤波对椒盐噪声特别有效
// 虽然不是线性卷积,但也是基于邻域运算
int kernel_size = 5;
CKImgFilter::MedianBlur(salt_pepper, denoised, kernel_size);
denoised.SaveToFile("median_denoised.bmp");
CKVision::ExitLibrary();
}
// 示例5:拉普拉斯锐化
void LaplacianSharpening()
{
CKVision::InitLibrary();
CKVision::CKImage blurry, laplacian, sharpened;
blurry.LoadFromFile("slightly_blurry.bmp");
// 拉普拉斯算子检测二阶导数(边缘)
CKImgFilter::Laplacian(blurry, laplacian, 3);
// 锐化:原图 - k*拉普拉斯
sharpened.Create(blurry.GetWidth(), blurry.GetHeight(), 8);
float k = 0.5f; // 锐化强度
for (int y = 0; y < blurry.GetHeight(); y++)
{
unsigned char* pb = blurry.GetLineAddr(y);
unsigned char* pl = laplacian.GetLineAddr(y);
unsigned char* ps = sharpened.GetLineAddr(y);
for (int x = 0; x < blurry.GetWidth(); x++)
{
float value = (float)pb[x] - k * ((float)pl[x] - 128);
ps[x] = (unsigned char)std::max(0.0f, std::min(255.0f, value));
}
}
laplacian.SaveToFile("laplacian_edges.bmp");
sharpened.SaveToFile("sharpened_image.bmp");
CKVision::ExitLibrary();
}
// 示例6:自定义卷积核
void CustomConvolution()
{
CKVision::InitLibrary();
CKVision::CKImage src, dst;
src.LoadFromFile("image.bmp");
// 定义自定义卷积核(边缘增强)
int kernel_size = 3;
float kernel[9] = {
-1, -1, -1,
-1, 9, -1,
-1, -1, -1
};
// 归一化因子(可选)
float scale = 1.0f;
float delta = 0.0f;
CKImgFilter::Filter2D(src, dst, kernel, kernel_size, scale, delta);
dst.SaveToFile("custom_filtered.bmp");
CKVision::ExitLibrary();
}
5.4 形态学运算:结构元素的线性组合
#include "CKBase.h"
// 示例:形态学运算
void MorphologicalOperations()
{
CKVision::InitLibrary();
CKVision::CKImage binary, eroded, dilated, opened, closed;
binary.LoadFromFile("binary_image.bmp");
// 定义结构元素(相当于卷积核)
CKVision::CKMask structuring_element;
// 圆形结构元素,半径=3
structuring_element.CreateCircle(3);
// 或矩形结构元素 5×5
// structuring_element.CreateRect(5, 5);
// 1. 腐蚀(Erosion):最小值滤波
// 用于去除小的白色噪声点
CKImgMorph::Erode(binary, eroded, structuring_element);
// 2. 膨胀(Dilation):最大值滤波
// 用于填充小的黑色孔洞
CKImgMorph::Dilate(binary, dilated, structuring_element);
// 3. 开运算(Opening):先腐蚀后膨胀
// 用于去除小物体、平滑边界
CKImgMorph::Open(binary, opened, structuring_element);
// 4. 闭运算(Closing):先膨胀后腐蚀
// 用于填充小孔洞、连接相近物体
CKImgMorph::Close(binary, closed, structuring_element);
eroded.SaveToFile("eroded.bmp");
dilated.SaveToFile("dilated.bmp");
opened.SaveToFile("opened.bmp");
closed.SaveToFile("closed.bmp");
CKVision::ExitLibrary();
}
六、图像运算:线性代数的直接应用
6.1 算术运算
#include "CKBase.h"
// 示例:CKImgOpera算术运算
void ImageArithmetic()
{
CKVision::InitLibrary();
CKVision::CKImage img1, img2, result;
img1.LoadFromFile("image1.bmp");
img2.LoadFromFile("image2.bmp");
// 1. 图像加法(像素级线性组合)
// result(x,y) = img1(x,y) + img2(x,y)
CKImgOpera::Add(img1, img2, result);
result.SaveToFile("added.bmp");
// 2. 图像减法(差分检测)
// result(x,y) = img1(x,y) - img2(x,y)
CKImgOpera::Subtract(img1, img2, result);
result.SaveToFile("difference.bmp");
// 3. 加权和(线性融合)
// result = α*img1 + β*img2
float alpha = 0.6f;
float beta = 0.4f;
CKImgOpera::AddWeighted(img1, alpha, img2, beta, 0, result);
result.SaveToFile("blended.bmp");
// 4. 乘以常数(亮度调节)
// result(x,y) = k * img1(x,y)
float k = 1.5f;
CKImgOpera::MulConst(img1, k, result);
result.SaveToFile("brightened.bmp");
// 5. 除以常数(归一化)
// result(x,y) = img1(x,y) / k
k = 2.0f;
CKImgOpera::DivConst(img1, k, result);
result.SaveToFile("normalized.bmp");
CKVision::ExitLibrary();
}
6.2 逻辑运算
// 示例:逻辑运算(用于ROI合并)
void ImageLogical()
{
CKVision::InitLibrary();
CKVision::CKImage mask1, mask2, result;
mask1.LoadFromFile("roi1.bmp"); // 二值图
mask2.LoadFromFile("roi2.bmp");
// 1. 按位与(交集)
CKImgOpera::And(mask1, mask2, result);
result.SaveToFile("intersection.bmp");
// 2. 按位或(并集)
CKImgOpera::Or(mask1, mask2, result);
result.SaveToFile("union.bmp");
// 3. 按位异或(对称差)
CKImgOpera::Xor(mask1, mask2, result);
result.SaveToFile("xor.bmp");
// 4. 按位非(反转)
CKImgOpera::Not(mask1, result);
result.SaveToFile("inverted.bmp");
CKVision::ExitLibrary();
}
6.3 统计分析
// 示例:像素统计
void PixelStatistics()
{
CKVision::InitLibrary();
CKVision::CKImage image;
image.LoadFromFile("part_image.bmp");
// 创建统计对象
CKVision::CKPixelStat stat;
stat.SetImage(image);
// 可选:设置ROI
// stat.SetROI(100, 100, 300, 200);
// 执行统计
stat.Execute();
// 获取统计结果(都是线性运算)
double mean = stat.GetMean(); // 均值:μ = (1/N)Σx_i
double stddev = stat.GetStdDev(); // 标准差:σ = sqrt((1/N)Σ(x_i-μ)²)
int min_val = stat.GetMin(); // 最小值
int max_val = stat.GetMax(); // 最大值
double sum = stat.GetSum(); // 总和:Σx_i
printf("Image Statistics:\n");
printf("Mean: %.2f\n", mean);
printf("Std Dev: %.2f\n", stddev);
printf("Min: %d\n", min_val);
printf("Max: %d\n", max_val);
printf("Sum: %.0f\n", sum);
CKVision::ExitLibrary();
}
七、实战案例:线性代数的综合应用
7.1 案例1:PCB板检测与测量
/*************************************************************
* 应用:PCB焊点检测与位置测量
* 线性代数应用:
* 1. 图像预处理(滤波:卷积)
* 2. 边缘检测(梯度:差分算子)
* 3. 圆拟合(最小二乘法:矩阵求解)
* 4. 坐标变换(仿射变换:矩阵乘法)
*************************************************************/
#include "CKBase.h"
#include "CKGauge.h"
class PCBInspection
{
public:
void InspectPCB()
{
CKVision::InitLibrary();
CKVision::CKImage pcb_image, enhanced;
pcb_image.LoadFromFile("pcb_board.bmp");
// 步骤1:图像增强(高斯模糊 + 对比度调整)
// 线性代数:卷积运算
CKVision::CKImage blurred;
CKImgFilter::GaussianBlur(pcb_image, blurred, 5, 1.5f);
// 对比度增强(线性变换:y = ax + b)
float contrast = 1.5f;
float brightness = 10.0f;
CKImgOpera::MulConst(blurred, contrast, enhanced);
CKImgOpera::AddConst(enhanced, brightness, enhanced);
// 步骤2:使用EdgeTool检测焊点边缘
// 线性代数:梯度计算(差分矩阵)
EdgeTool edge_detector;
edge_detector.SetImage(enhanced);
edge_detector.SetROI(200, 200, 100, 100, 0); // 检测区域
edge_detector.SetEdgeThreshold(30);
edge_detector.SetEdgePolarity(EDGE_POSITIVE);
if (edge_detector.Execute())
{
// 获取边缘点
std::vector<Point2f> edge_points = edge_detector.GetEdgePoints();
printf("Detected %d edge points\n", edge_points.size());
// 步骤3:圆形拟合(最小二乘法)
// 线性代数:Ax = b,求解超定方程组
FitCircle circle_fitter;
circle_fitter.SetPoints(edge_points);
if (circle_fitter.Execute())
{
float center_x = circle_fitter.GetCenterX();
float center_y = circle_fitter.GetCenterY();
float radius = circle_fitter.GetRadius();
float fit_error = circle_fitter.GetFitError();
printf("Solder pad detected:\n");
printf(" Center: (%.2f, %.2f)\n", center_x, center_y);
printf(" Radius: %.2f pixels\n", radius);
printf(" Fit error: %.4f\n", fit_error);
// 步骤4:像素坐标转世界坐标
// 线性代数:齐次坐标变换
float world_x, world_y;
PixelToWorld(center_x, center_y, world_x, world_y);
printf(" World coords: (%.2f, %.2f) mm\n",
world_x, world_y);
// 质量判断
bool size_ok = (radius >= 4.5f && radius <= 5.5f);
bool shape_ok = (fit_error < 0.5f);
if (size_ok && shape_ok)
{
printf("Solder pad: PASS\n");
}
else
{
printf("Solder pad: FAIL\n");
if (!size_ok) printf(" Reason: Size out of spec\n");
if (!shape_ok) printf(" Reason: Shape defect\n");
}
}
}
CKVision::ExitLibrary();
}
private:
void PixelToWorld(float px, float py, float& wx, float& wy)
{
// 使用相机标定矩阵转换
// [wx] [m11 m12 tx] [px]
// [wy] = [m21 m22 ty] [py]
// [1 ] [0 0 1 ] [1 ]
// 简化示例(实际应使用CKImageCalib)
float m11 = 0.1f, m12 = 0.0f, tx = -32.0f;
float m21 = 0.0f, m22 = 0.1f, ty = -24.0f;
wx = m11 * px + m12 * py + tx;
wy = m21 * px + m22 * py + ty;
}
};
7.2 案例2:工件姿态估计
/*************************************************************
* 应用:工件姿态识别与机器人引导
* 线性代数应用:
* 1. 模板匹配(归一化互相关:矩阵内积)
* 2. 主成分分析(协方差矩阵特征分解)
* 3. 旋转矩阵计算
*************************************************************/
#include "CKBase.h"
#include "CKLocate.h"
class PartPoseEstimation
{
public:
void EstimatePose()
{
CKVision::InitLibrary();
CKVision::CKImage scene, template_img;
scene.LoadFromFile("conveyor_scene.bmp");
template_img.LoadFromFile("part_template.bmp");
// 轮廓匹配定位
ContourMatch matcher;
matcher.SetTemplate(template_img);
matcher.SetImage(scene);
matcher.SetAngleRange(-180, 180); // 全角度搜索
matcher.SetScaleRange(0.8f, 1.2f); // 尺度范围
if (matcher.Execute() && matcher.GetMatchCount() > 0)
{
// 获取最佳匹配
float x = matcher.GetMatchX(0);
float y = matcher.GetMatchY(0);
float angle = matcher.GetMatchAngle(0);
float scale = matcher.GetMatchScale(0);
float score = matcher.GetMatchScore(0);
printf("Part located:\n");
printf(" Position: (%.1f, %.1f)\n", x, y);
printf(" Angle: %.2f°\n", angle);
printf(" Scale: %.3f\n", scale);
printf(" Match score: %.3f\n", score);
// 构建变换矩阵
// T = Translate(x,y) * Rotate(θ) * Scale(s)
CKVision::CKMat2D transform_matrix;
BuildTransformMatrix(x, y, angle, scale, transform_matrix);
// 输出机器人抓取姿态
printf("\nRobot pick pose:\n");
printf(" X: %.2f mm\n", x * 0.1f); // 像素转mm
printf(" Y: %.2f mm\n", y * 0.1f);
printf(" Rz: %.2f°\n", angle);
// 发送给机器人控制系统
SendToRobot(x * 0.1f, y * 0.1f, angle);
}
else
{
printf("Part not found in scene\n");
}
CKVision::ExitLibrary();
}
private:
void BuildTransformMatrix(float x, float y, float angle_deg,
float scale,
CKVision::CKMat2D& matrix)
{
matrix.Create(3, 3);
float angle_rad = angle_deg * M_PI / 180.0f;
float cos_a = cos(angle_rad);
float sin_a = sin(angle_rad);
// 组合变换矩阵
// [s·cosθ -s·sinθ tx]
// [s·sinθ s·cosθ ty]
// [0 0 1 ]
matrix.SetValue(0, 0, scale * cos_a);
matrix.SetValue(0, 1, -scale * sin_a);
matrix.SetValue(0, 2, x);
matrix.SetValue(1, 0, scale * sin_a);
matrix.SetValue(1, 1, scale * cos_a);
matrix.SetValue(1, 2, y);
matrix.SetValue(2, 0, 0);
matrix.SetValue(2, 1, 0);
matrix.SetValue(2, 2, 1);
}
void SendToRobot(float x, float y, float angle)
{
// 通过TCP/IP或其他协议发送给机器人
// 实际实现略
}
};
7.3 案例3:多图像降噪融合
/*************************************************************
* 应用:多帧图像降噪(时域降噪)
* 线性代数应用:矩阵加法和标量乘法
*************************************************************/
void MultiFrameDenoising()
{
CKVision::InitLibrary();
const int num_frames = 10;
std::vector<CKVision::CKImage> frames;
// 采集多帧图像
for (int i = 0; i < num_frames; i++)
{
CKVision::CKImage frame;
// 从相机采集或加载文件
char filename[64];
sprintf(filename, "frame_%02d.bmp", i);
frame.LoadFromFile(filename);
frames.push_back(frame);
}
// 像素级平均(线性组合)
// result = (1/N) * Σ frame_i
int width = frames[0].GetWidth();
int height = frames[0].GetHeight();
CKVision::CKImage sum, result;
sum.Create(width, height, 16); // 使用16位防止溢出
// 初始化为0
for (int y = 0; y < height; y++)
{
unsigned short* row = (unsigned short*)sum.GetLineAddr(y);
for (int x = 0; x < width; x++)
{
row[x] = 0;
}
}
// 累加所有帧
for (int i = 0; i < num_frames; i++)
{
for (int y = 0; y < height; y++)
{
unsigned char* frame_row = frames[i].GetLineAddr(y);
unsigned short* sum_row = (unsigned short*)sum.GetLineAddr(y);
for (int x = 0; x < width; x++)
{
sum_row[x] += frame_row[x];
}
}
}
// 求平均
result.Create(width, height, 8);
for (int y = 0; y < height; y++)
{
unsigned short* sum_row = (unsigned short*)sum.GetLineAddr(y);
unsigned char* result_row = result.GetLineAddr(y);
for (int x = 0; x < width; x++)
{
result_row[x] = (unsigned char)(sum_row[x] / num_frames);
}
}
result.SaveToFile("denoised_averaged.bmp");
// 计算信噪比提升
// 理论上SNR提升 = sqrt(N)
printf("Averaged %d frames\n", num_frames);
printf("Theoretical SNR improvement: %.2f dB\n",
10 * log10(num_frames));
CKVision::ExitLibrary();
}
八、性能优化:并行化的线性运算
8.1 多线程加速
#include "CKBase.h"
#include <omp.h>
// 示例:OpenMP并行化图像处理
void ParallelImageProcessing()
{
CKVision::InitLibrary();
CKVision::CKImage src, dst;
src.LoadFromFile("large_image.bmp");
int width = src.GetWidth();
int height = src.GetHeight();
dst.Create(width, height, 8);
// 并行处理(矩阵运算天然适合并行)
#pragma omp parallel for
for (int y = 0; y < height; y++)
{
unsigned char* src_row = src.GetLineAddr(y);
unsigned char* dst_row = dst.GetLineAddr(y);
for (int x = 0; x < width; x++)
{
// 某种复杂运算
int sum = 0;
for (int dy = -2; dy <= 2; dy++)
{
for (int dx = -2; dx <= 2; dx++)
{
int ny = std::max(0, std::min(height-1, y+dy));
int nx = std::max(0, std::min(width-1, x+dx));
unsigned char* neighbor_row = src.GetLineAddr(ny);
sum += neighbor_row[nx];
}
}
dst_row[x] = sum / 25;
}
}
dst.SaveToFile("processed_parallel.bmp");
CKVision::ExitLibrary();
}
九、总结:线性代数在CKVision中的地位
9.1 核心应用总结
|
应用领域 |
CKVision模块 |
线性代数概念 |
|
图像存储 |
CKImage |
矩阵 |
|
几何变换 |
CKImgTrans |
线性变换、齐次坐标 |
|
滤波处理 |
CKImgFilter |
卷积、矩阵内积 |
|
图像运算 |
CKImgOpera |
矩阵加减乘除 |
|
边缘检测 |
EdgeTool |
梯度、差分算子 |
|
形状拟合 |
FitCircle/FitLine |
最小二乘法、超定方程组 |
|
相机标定 |
CKImageCalib |
投影矩阵、最小二乘 |
|
姿态估计 |
ContourMatch |
旋转矩阵、特征匹配 |
|
数据降维 |
CKMat2D |
SVD、特征值分解 |
|
坐标变换 |
CKFrameTrans |
坐标系变换矩阵 |
9.2 从理论到实践的映射
数学理论 → CKVision实现:
- 矩阵乘法 → CKMat2D::Multiply()
- 卷积运算 → CKImgFilter::Convolution()
- 仿射变换 → CKImgTrans::AffineTransform()
- SVD分解 → CKMat2D::SVD()
- 最小二乘 → FitCircle::Execute()
- 坐标转换 → CKFrameTrans::Transform()
9.3 展望未来
线性代数将继续在以下领域发挥作用:
- 深度学习集成:卷积神经网络的矩阵运算
- 3D视觉:点云配准、三维重建
- 实时性能:GPU加速的矩阵运算
- 自适应算法:在线学习、动态标定
结语
"线性代数不仅仅是课本上冰冷的公式,它是数字世界的底色。从凯莱笔下的矩阵符号,到如今工业视觉引导机器人的算法,数学之美正通过每一个像素跳动,连接着历史与未来。"
当您使用CKVision SDK开发视觉检测系统时,请记住:每一次图像处理、每一个坐标变换、每一项测量计算,背后都是几百年来数学家们智慧的结晶。线性代数赋予了CKVision灵魂,让工业相机拥有了"看见"和"理解"世界的能力。
掌握线性代数,就掌握了机器视觉的本质。
参考文献:
- CKVision SDK 6.0 Documentation
- Gilbert Strang, "Linear Algebra and Its Applications"
- Richard Szeliski, "Computer Vision: Algorithms and Applications"

脑启社区是一个专注类脑智能领域的开发者社区。欢迎加入社区,共建类脑智能生态。社区为开发者提供了丰富的开源类脑工具软件、类脑算法模型及数据集、类脑知识库、类脑技术培训课程以及类脑应用案例等资源。
更多推荐


 12
12 0
0- 0


 已为社区贡献2条内容

所有评论(0)