零基础小白YOLO26训练完整篇(从环境到模型应用)
零基础小白YOLO26训练完整篇(从环境到模型应用)
📋 文章摘要
本文提供了从零开始使用 YOLO26 进行目标检测的从环境搭建 → 数据集准备 → 模型训练 → 云端训练 → 桌面端应用的完整流程。涵盖以下核心内容:
🛠️ 环境搭建
- Miniconda 安装:详细介绍了 Windows、Linux/macOS 系统的安装步骤及国内镜像源配置
- YOLO 环境配置:创建虚拟环境、安装 PyTorch(支持 GPU/CPU/Mac MPS)、安装 Ultralytics 库
- 环境验证:提供完整的安装验证代码示例
📊 数据集准备
- 格式转换:VOC 格式转 YOLO 格式的完整 Python 代码
- 数据集划分:8:1:1 比例划分训练集、验证集、测试集的自动化脚本
- 配置文件:创建
data.yaml配置文件的方法
🚀 模型训练与测试
- 本地训练:使用预训练权重进行模型训练的完整代码
- 云端训练:利用 Kaggle 免费 GPU 资源的详细步骤
- 模型测试:推理和验证模型的 Python 脚本
🖥️ 桌面端应用
- PyQt5 可视化系统:完整的桌面应用程序代码
- 功能模块:
- 全局配置管理
- 视频/摄像头实时检测
- 文件夹批量检测
- 用户登录界面
- 主窗口界面设计
- 核心特性:双画面显示、实时统计、结果保存、背景切换等
💡 关键要点
- 环境隔离:强烈推荐使用虚拟环境避免依赖冲突
- 硬件适配:提供 GPU、CPU、Mac MPS 三种 PyTorch 安装方案
- 云端方案:Kaggle 每周 30 小时免费 GPU 训练资源
- 完整流程:从数据集准备到桌面应用开发的端到端解决方案
- 代码完整:所有代码片段均可直接复制使用
⚡ 适用场景
- 计算机视觉初学者学习 YOLO 目标检测
- 需要快速部署 YOLO26 模型的开发者
- 希望将模型集成到桌面应用的工程师
- 资源有限需要利用云端 GPU 的研究者
一、Miniconda 下载与安装指南
1. 官方下载渠道
访问 Miniconda 官方下载页面,根据操作系统选择对应版本:
| 操作系统 | 下载版本 |
|---|---|
| Windows | Miniconda3-latest-Windows-x86_64.exe(64位)/ Miniconda3-latest-Windows-x86.exe(32位) |
| macOS | Intel 芯片:Miniconda3-latest-MacOSX-x86_64.pkg;Apple Silicon:Miniconda3-latest-MacOSX-arm64.pkg |
| Linux | Miniconda3-latest-Linux-x86_64.sh |
Windows 版本(百度网盘链接):
链接:https://pan.baidu.com/s/1szeJ8bRbTvkh3WFmzRZcxA?pwd=mgaa
提取码:mgaa
2. 分系统安装步骤
Windows 系统
- 双击下载的
.exe文件启动安装向导 - 关键设置:
- 安装路径建议选择无空格、无中文的目录(如
D:\Miniconda3) - 高级选项中不建议勾选 “Add Miniconda3 to my PATH environment variable”,避免与其他 Python 环境冲突
- 安装路径建议选择无空格、无中文的目录(如
- 安装完成后,通过开始菜单的「Anaconda Prompt (Miniconda3)」使用 conda 命令
Linux / macOS 系统
# 1. 赋予安装包执行权限
chmod +x Miniconda3-latest-Linux-x86_64.sh

# 2. 运行安装脚本
bash Miniconda3-latest-Linux-x86_64.sh

# 3. 按提示完成安装,初始化 conda 环境
source ~/.bashrc   # 或 source ~/.zshrc(根据 shell 类型)
3. 安装验证
打开终端 / Anaconda Prompt,输入以下命令验证安装:
conda --version    # 查看 conda 版本
python --version   # 查看 Python 版本
4. 国内镜像源配置(可选)
为加速包下载速度,可配置清华镜像源:
conda config --set show_channel_urls yes
编辑 .condarc 文件,添加以下配置:
channels:
  - defaults
show_channel_urls: true
default_channels:
  - https://mirrors.tuna.tsinghua.edu.cn/anaconda/pkgs/main
  - https://mirrors.tuna.tsinghua.edu.cn/anaconda/pkgs/r
  - https://mirrors.tuna.tsinghua.edu.cn/anaconda/pkgs/msys2
custom_channels:
  conda-forge: https://mirrors.tuna.tsinghua.edu.cn/anaconda/cloud
  msys2: https://mirrors.tuna.tsinghua.edu.cn/anaconda/cloud
  bioconda: https://mirrors.tuna.tsinghua.edu.cn/anaconda/cloud
  menpo: https://mirrors.tuna.tsinghua.edu.cn/anaconda/cloud
  pytorch: https://mirrors.tuna.tsinghua.edu.cn/anaconda/cloud
  pytorch-lts: https://mirrors.tuna.tsinghua.edu.cn/anaconda/cloud
二、YOLO 环境搭建与验证指南
1. 创建虚拟环境(强烈推荐)
使用 conda 创建虚拟环境:
conda create -n yolo26 python=3.11 -y
conda activate yolo26
或使用 venv:
python -m venv yolo26_env
# macOS / Linux
source yolo26_env/bin/activate
# Windows
yolo26_env\Scripts\activate
2. 安装 PyTorch
根据你的硬件选择对应版本:
GPU 版本(CUDA 12.1)— 推荐:
pip install torch torchvision torchaudio --index-url https://download.pytorch.org/whl/cu121
CPU 版本:
pip install torch torchvision torchaudio
macOS Apple Silicon(M1/M2/M3/M4,自带 MPS 支持):
pip install torch torchvision torchaudio
3. 安装 Ultralytics
pip install ultralytics
4. 验证安装
推理返回的是一个 Results 列表,每个元素对应一张图片的检测结果。
打印某张图片所有检测目标的示例:
r = results[0]
for box in r.boxes:
    cls_id = int(box.cls[0])
    print(f"{r.names[cls_id]}: 置信度={float(box.conf[0]):.2f}, 坐标={box.xyxy[0].tolist()}")

# 输出示例:
# person: 置信度=0.92,坐标=[52.0, 398.0, 231.0, 896.0]
# bus: 置信度=0.87,坐标=[16.0, 230.0, 801.0, 768.0]
⚠️ 注意事项
- 不要在系统全局 Python 中安装,务必使用虚拟环境隔离
- GPU 训练必须安装 CUDA 对应版本的 PyTorch,去 PyTorch 官网确认版本对应关系
- macOS 用户可以使用
device="mps"来利用 Apple Silicon 加速训练 - Windows 用户如果遇到
RuntimeError,需要在脚本中添加if __name__ == "__main__":保护
三、YOLO 模型训练与测试指南
1. 数据集 VOC 格式转 YOLO 格式
如何查看自己数据集格式:
打开 Annotations 文件夹,如果看到文件后缀为 .xml,则为 VOC 格式;如果文件后缀为 .txt 则为 YOLO 格式(后缀名看不到请搜索"如何显示文件后缀名")。YOLO26 训练需要转为 YOLO 格式,转换代码如下:
import os
import xml.etree.ElementTree as ET

# 定义类别顺序
categories = ['改为自己的类别']  # 运行 ViewCategory.py 查看类别
category_to_index = {category: index for index, category in enumerate(categories)}

# 定义输入文件夹和输出文件夹
input_folder = r'f:\data\Annotations'   # 替换为实际的 XML 文件夹路径
output_folder = r'f:\data\labels'       # 替换为实际的输出 TXT 文件夹路径

# 确保输出文件夹存在
os.makedirs(output_folder, exist_ok=True)

# 遍历输入文件夹中的所有 XML 文件
for filename in os.listdir(input_folder):
    if filename.endswith('.xml'):
        xml_path = os.path.join(input_folder, filename)
        # 解析 XML 文件
        tree = ET.parse(xml_path)
        root = tree.getroot()
        # 提取图像的尺寸
        size = root.find('size')
        width = int(size.find('width').text)
        height = int(size.find('height').text)
        # 存储 name 和对应的归一化坐标
        objects = []

        # 遍历 XML 中的 object 标签
        for obj in root.findall('object'):
            name = obj.find('name').text
            if name in category_to_index:
                category_index = category_to_index[name]
            else:
                continue  # 如果 name 不在指定类别中,跳过该 object

            bndbox = obj.find('bndbox')
            xmin = int(bndbox.find('xmin').text)
            ymin = int(bndbox.find('ymin').text)
            xmax = int(bndbox.find('xmax').text)
            ymax = int(bndbox.find('ymax').text)
运行说明:
- 需要自行将类别替换,这里顺序要记住
- 文件夹路径也需要对应替换
2. 数据集划分
训练自己的 YOLO26 检测模型,数据集需要划分为训练集、验证集和测试集。这里提供一个参考代码,划分比例为 8:1:1,也可以按照自己的比例划分(已划分过的数据集则不用重复划分):
import os
import random
import shutil

file_path = r'F:\data\images'
label_path = r'F:\data\labels'
new_file_path = r'F:\data\dataset'

train_rate, val_rate = 0.8, 0.1

# 获取所有图片和标签文件(按文件名无后缀分组)
images = {os.path.splitext(f)[0]: f for f in os.listdir(file_path)}
labels = {os.path.splitext(f)[0]: f for f in os.listdir(label_path)}

# 匹配同时有图片和标签的数据
matched_data = [(img, images[img], labels[img]) for img in images if img in labels]

# 检查未匹配的文件
unmatched_images = [img for img in images if img not in labels]
unmatched_labels = [label for label in labels if label not in images]
if unmatched_images:
    print("未匹配的图片文件:")
    for img in unmatched_images:
        print(images[img])
if unmatched_labels:
    print("未匹配的标签文件:")
    for label in unmatched_labels:
        print(labels[label])

random.shuffle(matched_data)
total = len(matched_data)
train_data = matched_data[:int(train_rate * total)]
val_data = matched_data[int(train_rate * total):int((train_rate + val_rate) * total)]
test_data = matched_data[int((train_rate + val_rate) * total):]

def copy_files(data_list, subset):
    for img_name, img_file, label_file in data_list:
        shutil.copy(
            os.path.join(file_path, img_file),
            os.path.join(new_file_path, subset, 'images', img_file)
        )
        shutil.copy(
            os.path.join(label_path, label_file),
            os.path.join(new_file_path, subset, 'labels', label_file)
        )

copy_files(train_data, 'train')
copy_files(val_data, 'val')
copy_files(test_data, 'test')
代码说明:
- 代码可以自动划分各种格式的图片及标签文件
- 无论图片及标签数量是否对应,均会对应移动到相同的文件夹下
- 会自动检测并给出出现差异的图片或标签文件名,方便快速查找原因
- 划分完成后数据集的准备工作就完成了
3. YOLO 模型训练
3.1 创建 data.yaml
在 YOLO26 根目录下创建一个新的 data.yaml 文件,文件名可自定义但后缀必须为 .yaml。文件内容如下:
path: F:\data\dataset
train: train/images
val: val/images
test: test/images

nc: 1          # 类别数量
names: ['bicycle']   # 类别名称
其他路径和类别需自行替换,注意类别顺序必须与数据集转换部分的类别顺序保持一致。
3.2 训练模型
使用官方提供的预训练权重进行训练,推荐使用 yolo26n.pt,也可选择 yolo26s.pt 等其他模型。模型大小关系为 n < s < m < l < x,模型越大训练时长成倍增加。
下载预训练权重后放入根目录,创建一个 train.py 文件:
import warnings
warnings.filterwarnings('ignore')
from ultralytics import YOLO

if __name__ == '__main__':
    # 直接加载完整模型(自带模型结构 + 预训练权重)
    model = YOLO('yolo26n.pt')

    results = model.train(
        data=r'C:\AI_Project\bicycleDetection\VOCData\mydata.yaml',
        epochs=100,          # 训练轮次总数
        batch=16,            # 批量大小,即单次输入多少图片训练
        imgsz=640,           # 训练图像尺寸
        workers=8,           # 加载数据的工作线程数
        device='cpu',        # 指定训练的计算设备(如:device=0),无 nvidia 显卡则改为 'cpu'
        optimizer='SGD',     # 训练使用优化器,可选 auto, SGD, Adam, AdamW 等
        amp=False,           # True 或 False,自动混合精度(AMP)训练
        cache=False          # True 在内存中缓存数据集图像,服务器推荐开启
    )
4. 模型测试
找到之前训练结果的保存路径,创建 predict.py 文件:
from ultralytics import YOLO

model = YOLO('runs/train/exp/weights/best.pt')
model.predict(source='test/images', save=True)
在测试集上推理模型精度的代码,可新增 val.py 文件:
from ultralytics import YOLO

model = YOLO('runs/train/exp/weights/best.pt')
model.val(data='mydata.yaml')
四、Kaggle GPU 训练
若本地资源不够,模型训练时间太长,可以使用 Kaggle 平台的云端资源,借用云端的 GPU 进行训练。该平台每周有 30h 免费 GPU 训练时长。
👉 https://www.kaggle.com/
1. 导入数据集
登录后,点击左上角 Create → 选择 Dataset → 点击 New Dataset,将数据集文件拖到 Upload 框导入数据,填写名字(Dataset Title,仅英文、数字、下划线)和 Visibility: Private(私有,仅自己可见)。上传完成后,点击 Create 创建,生成专属数据集仓库。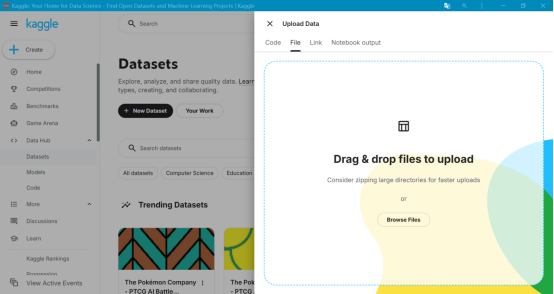
2. 新建 Notebook
点击左上角 Create → 选择 Notebook,修改右上角名称后,点击 Input 栏下的 Add Input,找到刚新建的专属数据集,点击 + 号进行数据集绑定。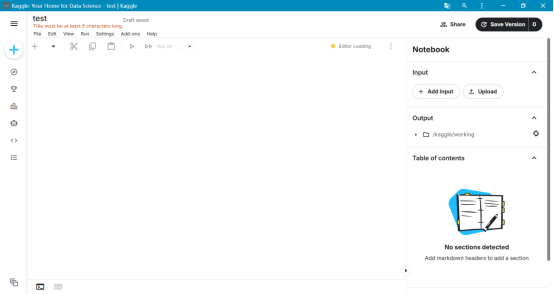
然后在左侧的 Cell 框内复制代码,进行训练:
from ultralytics import YOLO

model = YOLO('yolo26n.pt')
model.train(
    data=r'这里修改成你上传的数据集文件 mydata.yaml 的路径',
    epochs=40,
    batch=16,
    imgsz=640,
    workers=8,
    device=0,
    optimizer='SGD',
    amp=False,
    cache=False,
    save_period=10    # 每训练 10 轮保存 1 次
)

# 打包训练后的结果
zip -r runs.zip /kaggle/working/runs
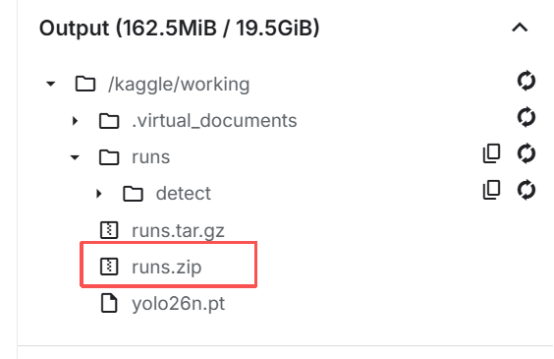
代码运行完成后,会在右侧 Output 栏出现压缩包,点击 runs.zip 右侧的三个点,点击 Download,就完成云端训练和资源下载了。
五、模型应用(PyQt5 可视化系统)
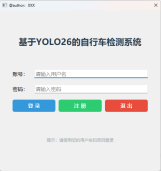
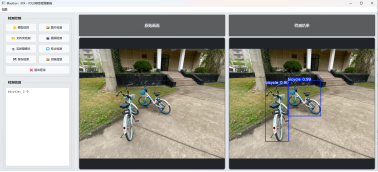
项目结构概览
| 模块 | 功能 |
|---|---|
GlobalConfig |
全局配置参数 |
VideoDetectThread |
视频/摄像头推理线程 |
FolderDetectThread |
文件夹批量检测线程 |
LoginDialog |
登录对话框 |
MainWindow |
主窗口 |
1. 全局配置(GlobalConfig)
class GlobalConfig:
    # 作者信息
    author = "@author:XXX"
    # 系统名称
    sys_name = "基于YOLO26的自行车检测系统"
    # 模型相关
    DEFAULT_MODEL_PATH = ""       # 默认模型路径,为空则每次手动选择
    CONF_THRESHOLD = 0.25        # 检测置信度阈值
    IOU_THRESHOLD = 0.45         # NMS 的 IoU 阈值

    # 类别映射(根据训练的数据集修改)
    CLASS_NAMES = {
        0: "bicycle",
    }
    # 需要统计的类别 ID
    STAT_CLASS_IDS = {0}

    # 摄像头设备 ID
    CAMERA_DEVICE_ID = 0
    # 视频/摄像头处理时每帧等待时间(毫秒,控制帧率)
    FRAME_DELAY_MS = 30

    # 界面相关
    WINDOW_WIDTH = 1400
    WINDOW_HEIGHT = 700
    LEFT_PANEL_WIDTH = 320
    RIGHT_PANEL_WIDTH = 1040

    # 背景图片默认路径
    DEFAULT_BG_IMAGE = ""

    # 用户数据文件
    USER_FILE = "user.txt"

    # 保存视频的编码格式和帧率
    VIDEO_CODEC = "mp4v"     # MP4 编码
    VIDEO_FPS = 20.0         # 输出视频帧率(摄像头用)
2. 视频/摄像头检测线程(VideoDetectThread)
class VideoDetectThread(QThread):
    """视频文件或摄像头的实时检测线程,支持保存检测后的视频"""
    frame_signal = pyqtSignal(object)     # 发送 [原始帧, 标注帧]
    info_signal = pyqtSignal(str)        # 发送日志信息
    finished_signal = pyqtSignal()       # 任务结束信号

    def __init__(self, model, source_type, source_path=None, output_video_path=None):
        super().__init__()
        self.model = model
        self.source_type = source_type       # "video" 或 "camera"
        self.source_path = source_path
        self.output_video_path = output_video_path
        self.is_running = True
        self.cap = None
        self.video_writer = None
        self.original_fps = None

    def run(self):
        # 打开视频源
        if self.source_type == "camera":
            self.cap = cv2.VideoCapture(GlobalConfig.CAMERA_DEVICE_ID, cv2.CAP_DSHOW)
            self.info_signal.emit("✅ 摄像头已开启,开始实时检测...")
            if self.output_video_path:
                self.info_signal.emit(f"📹 检测视频将保存至: {self.output_video_path}")
        else:  # video
            self.cap = cv2.VideoCapture(self.source_path)
            self.info_signal.emit(f"✅ 开始解析视频: {os.path.basename(self.source_path)}")

        # 获取原视频帧率和尺寸
        self.original_fps = self.cap.get(cv2.CAP_PROP_FPS)
        if self.original_fps <= 0:
            self.original_fps = GlobalConfig.VIDEO_FPS

        if not self.cap or not self.cap.isOpened():
            self.info_signal.emit("❌ 打开视频/摄像头失败!")
            self.finished_signal.emit()
            return

        # 初始化视频写入器(如果需要保存)
        if self.output_video_path:
            ret, frame = self.cap.read()
            if ret:
                h, w = frame.shape[:2]
                fourcc = cv2.VideoWriter_fourcc(*GlobalConfig.VIDEO_CODEC)
                fps = self.original_fps if self.original_fps else GlobalConfig.VIDEO_FPS
                self.video_writer = cv2.VideoWriter(self.output_video_path, fourcc, fps, (w, h))
                self.cap.set(cv2.CAP_PROP_POS_FRAMES, 0)
            else:
                self.info_signal.emit("⚠️ 无法读取视频帧,将不保存视频")

        while self.is_running:
            ret, frame = self.cap.read()
            if not ret:
                break

            # YOLO 推理
            results = self.model.predict(
                frame,
                conf=GlobalConfig.CONF_THRESHOLD,
                iou=GlobalConfig.IOU_THRESHOLD
            )
            annotated_frame = results[0].plot()

            # 保存标注帧到视频文件
            if self.video_writer is not None:
                self.video_writer.write(annotated_frame)

            # 发送到主界面显示
            self.frame_signal.emit([frame, annotated_frame])

            # 控制帧率
            self.msleep(GlobalConfig.FRAME_DELAY_MS)

        # 释放资源
        if self.cap:
            self.cap.release()
        if self.video_writer:
            self.video_writer.release()
        cv2.destroyAllWindows()
        self.finished_signal.emit()
        if self.output_video_path and os.path.exists(self.output_video_path):
            self.info_signal.emit(f"✅ 检测视频已保存至: {self.output_video_path}")
        self.info_signal.emit("检测任务已停止")

    def stop_task(self):
        self.is_running = False
3. 文件夹批量检测线程(FolderDetectThread)
class FolderDetectThread(QThread):
    """文件夹批量图片检测线程,自动将检测结果保存到输出文件夹"""
    progress_signal = pyqtSignal(int, int)       # 当前索引, 总数
    image_result_signal = pyqtSignal(object, object, object)  # 原图, 标注图, 结果对象
    info_signal = pyqtSignal(str)
    finished_signal = pyqtSignal()

    def __init__(self, model, folder_path, output_dir):
        super().__init__()
        self.model = model
        self.folder_path = folder_path
        self.output_dir = output_dir
        self.is_running = True

    def run(self):
        image_suffix = (".jpg", ".jpeg", ".png", ".bmp")
        image_paths = []
        for filename in os.listdir(self.folder_path):
            if filename.lower().endswith(image_suffix):
                image_paths.append(os.path.join(self.folder_path, filename))

        total = len(image_paths)
        if total == 0:
            self.info_signal.emit("⚠️ 文件夹中没有找到图片文件")
            self.finished_signal.emit()
            return

        # 创建输出文件夹
        os.makedirs(self.output_dir, exist_ok=True)

        self.info_signal.emit(f"📂 开始批量检测文件夹,共 {total} 张图片")
        self.info_signal.emit(f"💾 检测结果将保存至: {self.output_dir}")

        for idx, img_path in enumerate(image_paths):
            if not self.is_running:
                break
            self.progress_signal.emit(idx + 1, total)
            self.info_signal.emit(f"----- 检测第 {idx+1}/{total} 张: {os.path.basename(img_path)} -----")

            image = cv2.imread(img_path)
            if image is None:
                self.info_signal.emit(f"❌ 图片读取失败: {img_path}")
                continue

            results = self.model.predict(
                image,
                conf=GlobalConfig.CONF_THRESHOLD,
                iou=GlobalConfig.IOU_THRESHOLD
            )
            if results:
                annotated_image = results[0].plot()
                # 保存检测结果图片
                name, ext = os.path.splitext(os.path.basename(img_path))
                output_path = os.path.join(self.output_dir, f"{name}_detected{ext}")
                cv2.imwrite(output_path, annotated_image)
                self.image_result_signal.emit(image, annotated_image, results[0])

            self.msleep(100)

        self.finished_signal.emit()
        self.info_signal.emit(f"✅ 文件夹批量检测结束,结果保存在: {self.output_dir}")

    def stop_task(self):
        self.is_running = False
4. 登录对话框(LoginDialog)
class LoginDialog(QDialog):
    def __init__(self):
        super().__init__()
        self.setWindowTitle(GlobalConfig.author)
        self.setWindowFlags(Qt.WindowCloseButtonHint)
        self.setFixedSize(500, 500)
        self.setup_ui()

    def setup_ui(self):
        main_layout = QVBoxLayout()
        main_layout.setContentsMargins(40, 30, 40, 30)
        main_layout.setSpacing(20)

        # 标题标签
        title_label = QLabel(GlobalConfig.sys_name)
        title_label.setFont(QFont("微软雅黑", 20, QFont.Bold))
        title_label.setStyleSheet("color: #2c3e50;")
        title_label.setAlignment(Qt.AlignCenter)
        title_label.setWordWrap(True)
        main_layout.addWidget(title_label)

        # 账号输入
        username_layout = QHBoxLayout()
        username_label = QLabel("账号:")
        username_label.setFont(QFont("微软雅黑", 12))
        self.username_input = QLineEdit()
        self.username_input.setPlaceholderText("请输入用户名")
        self.username_input.setFont(QFont("微软雅黑", 12))
        username_layout.addWidget(username_label)
        username_layout.addWidget(self.username_input)
        main_layout.addLayout(username_layout)

        # 密码输入
        password_layout = QHBoxLayout()
        password_label = QLabel("密码:")
        password_label.setFont(QFont("微软雅黑", 12))
        self.password_input = QLineEdit()
        self.password_input.setPlaceholderText("请输入密码")
        self.password_input.setEchoMode(QLineEdit.Password)
        self.password_input.setFont(QFont("微软雅黑", 12))
        password_layout.addWidget(password_label)
        password_layout.addWidget(self.password_input)
        main_layout.addLayout(password_layout)

        # 按钮
        button_layout = QHBoxLayout()
        button_layout.setSpacing(10)

        login_button = QPushButton("登录")
        login_button.setFont(QFont("微软雅黑", 12, QFont.Bold))
        login_button.setStyleSheet("""
            QPushButton { background-color: #3498db; color: white; border-radius: 6px; padding: 8px; }
            QPushButton:hover { background-color: #2980b9; }
        """)
        login_button.clicked.connect(self.handle_login)

        register_button = QPushButton("注册")
        register_button.setFont(QFont("微软雅黑", 12, QFont.Bold))
        register_button.setStyleSheet("""
            QPushButton { background-color: #2ecc71; color: white; border-radius: 6px; padding: 8px; }
            QPushButton:hover { background-color: #27ae60; }
        """)
        register_button.clicked.connect(self.handle_register)

        exit_button = QPushButton("退出")
        exit_button.setFont(QFont("微软雅黑", 12, QFont.Bold))
        exit_button.setStyleSheet("""
            QPushButton { background-color: #e74c3c; color: white; border-radius: 6px; padding: 8px; }
            QPushButton:hover { background-color: #c0392b; }
        """)
        exit_button.clicked.connect(self.close)

        button_layout.addWidget(login_button)
        button_layout.addWidget(register_button)
        button_layout.addWidget(exit_button)
        main_layout.addLayout(button_layout)

        # 提示信息
        hint_label = QLabel("提示: 请使用您的用户名和密码登录")
        hint_label.setFont(QFont("微软雅黑", 10))
        hint_label.setStyleSheet("color: #95a5a6;")
        hint_label.setAlignment(Qt.AlignCenter)
        main_layout.addWidget(hint_label)

        self.setLayout(main_layout)

    def load_credentials(self):
        credentials = {}
        try:
            with open(GlobalConfig.USER_FILE, "r", encoding="utf-8") as file:
                for line in file:
                    line = line.strip()
                    if not line:
                        continue
                    username, password = line.split("=")
                    credentials[username] = password
            return credentials
        except FileNotFoundError:
            return {}
        except Exception as e:
            QMessageBox.warning(self, "错误", f"加载用户信息失败: {str(e)}")
            return {}

    def handle_login(self):
        credentials = self.load_credentials()
        username = self.username_input.text().strip()
        password = self.password_input.text().strip()
        if username in credentials and credentials[username] == password:
            QMessageBox.information(self, "成功", "登录成功!")
            self.accept()
        else:
            QMessageBox.warning(self, "错误", "用户名或密码错误!")
            self.password_input.clear()

    def handle_register(self):
        credentials = self.load_credentials()
        username = self.username_input.text().strip()
        password = self.password_input.text().strip()
        if not username or not password:
            QMessageBox.warning(self, "错误", "用户名和密码不能为空!")
            return
        if username in credentials:
            QMessageBox.warning(self, "错误", "用户名已存在!")
            return
        credentials[username] = password
        try:
            with open(GlobalConfig.USER_FILE, "w", encoding="utf-8") as file:
                for uname, pwd in credentials.items():
                    file.write(f"{uname}={pwd}\n")
            QMessageBox.information(self, "成功", "注册成功! 请登录。")
            self.username_input.clear()
            self.password_input.clear()
        except Exception as e:
            QMessageBox.critical(self, "错误", f"保存用户信息失败: {str(e)}")
5. 主窗口(MainWindow)
class MainWindow(QMainWindow):
    def __init__(self):
        super().__init__()
        self.model = None
        self.current_annotated_image = None
        self.current_results = None
        self.detect_thread = None
        self.folder_thread = None
        self.is_detecting = False
        self.current_detection_type = None  # "image", "folder", "video", "camera"

        self.init_ui()
        self.apply_background(GlobalConfig.DEFAULT_BG_IMAGE)

    def init_ui(self):
        self.setWindowTitle(f"{GlobalConfig.author} - YOLO综合检测系统")
        self.setWindowIcon(QIcon("icon.png"))
        self.resize(GlobalConfig.WINDOW_WIDTH, GlobalConfig.WINDOW_HEIGHT)

        # 菜单栏
        menubar = self.menuBar()
        view_menu = menubar.addMenu("视图")
        change_bg_action = QAction("切换背景图片", self)
        change_bg_action.triggered.connect(self.change_background)
        view_menu.addAction(change_bg_action)

        # 主分割器
        main_splitter = QSplitter(Qt.Horizontal)
        self.setCentralWidget(main_splitter)

        # ========== 左侧面板 ==========
        left_widget = QWidget()
        left_widget.setFixedWidth(GlobalConfig.LEFT_PANEL_WIDTH)
        left_layout = QVBoxLayout(left_widget)
        left_layout.setContentsMargins(15, 15, 15, 15)
        left_layout.setSpacing(15)

        # 检测控制按钮组
        btn_group = QGroupBox("检测控制")
        btn_group.setStyleSheet("""
            QGroupBox {
                font: bold 14px "微软雅黑";
                border: 1px solid #ccc;
                border-radius: 8px;
                margin-top: 12px;
                padding-top: 10px;
            }
            QGroupBox::title {
                subcontrol-origin: margin;
                left: 10px;
                padding: 0 8px;
            }
        """)

        grid_layout = QGridLayout()
        grid_layout.setSpacing(10)

        self.load_model_btn = QPushButton("🔧 模型选择")
        self.image_detect_btn = QPushButton("🖼️ 图片检测")
        self.folder_detect_btn = QPushButton("📁 文件夹检测")
        self.video_detect_btn = QPushButton("🎬 视频检测")
        self.camera_detect_btn = QPushButton("📷 实时摄像头")
        self.stop_btn = QPushButton("⏹️ 停止检测")
        self.save_btn = QPushButton("💾 保存结果")
        self.bg_switch_btn = QPushButton("🎨 切换背景")
        self.exit_btn = QPushButton("❌ 退出程序")

        buttons = [
            self.load_model_btn, self.image_detect_btn, self.folder_detect_btn,
            self.video_detect_btn, self.camera_detect_btn, self.stop_btn,
            self.save_btn, self.bg_switch_btn, self.exit_btn
        ]

        btn_style = """
            QPushButton {
                background-color: #f8f9fa;
                border: 1px solid #dee2e6;
                border-radius: 6px;
                color: #495057;
                font: bold 12px "微软雅黑";
                padding: 8px;
                text-align: center;
            }
            QPushButton:hover { background-color: #e9ecef; border-color: #adb5bd; }
            QPushButton:pressed { background-color: #dee2e6; }
        """

        for btn in buttons:
            btn.setStyleSheet(btn_style)
            btn.setCursor(Qt.PointingHandCursor)

        grid_layout.addWidget(self.load_model_btn, 0, 0)
        grid_layout.addWidget(self.image_detect_btn, 0, 1)
        grid_layout.addWidget(self.folder_detect_btn, 1, 0)
        grid_layout.addWidget(self.video_detect_btn, 1, 1)
        grid_layout.addWidget(self.camera_detect_btn, 2, 0)
        grid_layout.addWidget(self.stop_btn, 2, 1)
        grid_layout.addWidget(self.save_btn, 3, 0)
        grid_layout.addWidget(self.bg_switch_btn, 3, 1)
        grid_layout.addWidget(self.exit_btn, 4, 0, 1, 2)
        btn_group.setLayout(grid_layout)
        left_layout.addWidget(btn_group)

        # 检测信息面板
        info_group = QGroupBox("检测信息")
        info_group.setStyleSheet(btn_group.styleSheet())
        self.output_text = QTextEdit()
        self.output_text.setReadOnly(True)
        self.output_text.setStyleSheet("""
            background-color: #ffffff;
            border: 1px solid #ced4da;
            border-radius: 5px;
            font: 12px "Consolas";
            padding: 5px;
        """)
        info_layout = QVBoxLayout()
        info_layout.addWidget(self.output_text)
        info_group.setLayout(info_layout)
        left_layout.addWidget(info_group)

        # ========== 右侧双画面 ==========
        right_widget = QWidget()
        right_layout = QHBoxLayout(right_widget)
        right_layout.setContentsMargins(10, 10, 10, 10)
        right_layout.setSpacing(15)

        # 左侧原始画面
        left_panel = QWidget()
        left_panel_layout = QVBoxLayout(left_panel)
        left_panel_layout.setContentsMargins(0, 0, 0, 0)
        left_panel_layout.setSpacing(5)

        origin_title = QLabel("原始画面")
        origin_title.setAlignment(Qt.AlignCenter)
        origin_title.setFont(QFont("微软雅黑", 12, QFont.Bold))
        origin_title.setStyleSheet("color: white; background-color: rgba(0,0,0,0.6); border-radius: 4px; padding: 4px;")
        left_panel_layout.addWidget(origin_title)

        self.origin_label = QLabel()
        self.origin_label.setAlignment(Qt.AlignCenter)
        self.origin_label.setMinimumSize(620, 560)
        self.origin_label.setStyleSheet("""
            border: 2px solid #6c757d;
            border-radius: 8px;
            background-color: #212529;
        """)
        left_panel_layout.addWidget(self.origin_label)

        # 右侧检测结果画面
        right_panel = QWidget()
        right_panel_layout = QVBoxLayout(right_panel)
        right_panel_layout.setContentsMargins(0, 0, 0, 0)
        right_panel_layout.setSpacing(5)

        result_title = QLabel("检测结果")
        result_title.setAlignment(Qt.AlignCenter)
        result_title.setFont(QFont("微软雅黑", 12, QFont.Bold))
        result_title.setStyleSheet("color: white; background-color: rgba(0,0,0,0.6); border-radius: 4px; padding: 4px;")
        right_panel_layout.addWidget(result_title)

        self.result_label = QLabel()
        self.result_label.setAlignment(Qt.AlignCenter)
        self.result_label.setMinimumSize(620, 560)
        self.result_label.setStyleSheet("""
            border: 2px solid #6c757d;
            border-radius: 8px;
            background-color: #212529;
        """)
        right_panel_layout.addWidget(self.result_label)

        right_layout.addWidget(left_panel)
        right_layout.addWidget(right_panel)

        main_splitter.addWidget(left_widget)
        main_splitter.addWidget(right_widget)
        main_splitter.setSizes([GlobalConfig.LEFT_PANEL_WIDTH, GlobalConfig.RIGHT_PANEL_WIDTH])

        # ========== 信号连接 ==========
        self.load_model_btn.clicked.connect(self.load_model)
        self.image_detect_btn.clicked.connect(self.select_image)
        self.folder_detect_btn.clicked.connect(self.detect_folder)
        self.video_detect_btn.clicked.connect(self.select_video)
        self.camera_detect_btn.clicked.connect(self.start_camera)
        self.stop_btn.clicked.connect(self.stop_all_detect)
        self.save_btn.clicked.connect(self.save_detection)
        self.bg_switch_btn.clicked.connect(self.change_background)
        self.exit_btn.clicked.connect(self.exit_application)

    # ========== 背景切换 ==========
    def apply_background(self, image_path):
        if image_path and os.path.exists(image_path):
            normalized_path = image_path.replace('\\', '/')
            self.setStyleSheet(f"""
                QMainWindow {{
                    background-image: url("{normalized_path}");
                    background-repeat: no-repeat;
                    background-position: center;
                    background-attachment: fixed;
                }}
            """)
        else:
            self.setStyleSheet("""
                QMainWindow {
                    background: qlineargradient(x1:0, y1:0, x2:1, y2:1,
                        stop:0 #e9ecef, stop:1 #dee2e6);
                }
            """)

    def change_background(self):
        file_path, _ = QFileDialog.getOpenFileName(
            self, "选择背景图片", "", "图片文件 (*.png *.jpg *.jpeg *.bmp)"
        )
        if file_path:
            self.apply_background(file_path)
            self.output_text.append(f"🎨 背景图片已切换: {os.path.basename(file_path)}")

    # ========== 辅助方法 ==========
    def clear_display(self):
        self.origin_label.clear()
        self.result_label.clear()
        self.output_text.clear()
        self.current_annotated_image = None
        self.current_results = None

    def update_image_display(self, original_img, annotated_img):
        if original_img is not None:
            rgb = cv2.cvtColor(original_img, cv2.COLOR_BGR2RGB)
            h, w, c = rgb.shape
            qimg = QImage(rgb.data, w, h, 3 * w, QImage.Format_RGB888)
            self.origin_label.setPixmap(
                QPixmap.fromImage(qimg).scaled(
                    self.origin_label.size(), Qt.KeepAspectRatio, Qt.SmoothTransformation
                )
            )
        if annotated_img is not None:
            rgb_ann = cv2.cvtColor(annotated_img, cv2.COLOR_BGR2RGB)
            h2, w2, c2 = rgb_ann.shape
            qimg2 = QImage(rgb_ann.data, w2, h2, 3 * w2, QImage.Format_RGB888)
            self.result_label.setPixmap(
                QPixmap.fromImage(qimg2).scaled(
                    self.result_label.size(), Qt.KeepAspectRatio, Qt.SmoothTransformation
                )
            )

    def display_statistics(self, results_obj):
        if results_obj is None:
            return
        detected_classes = []
        if hasattr(results_obj, 'boxes') and results_obj.boxes is not None:
            classes = results_obj.boxes.cls.cpu().numpy().astype(int).tolist()
            for cls in classes:
                if cls in GlobalConfig.STAT_CLASS_IDS:
                    detected_classes.append(cls)
        class_counts = Counter(detected_classes)
        if not class_counts:
            self.output_text.setText("未检测到目标")
            return
        output = ""
        for cls_id, count in class_counts.items():
            label = GlobalConfig.CLASS_NAMES.get(cls_id, f"类别{cls_id}")
            output += f"{label}: {count}个\n"
        self.output_text.setText(output)

    # ========== 模型加载 ==========
    def load_model(self):
        if self.is_detecting:
            QMessageBox.warning(self, "提示", "请先停止当前检测任务!")
            return
        model_path, _ = QFileDialog.getOpenFileName(
            self, "选择YOLO模型文件", "", "模型文件 (*.pt)"
        )
        if model_path:
            try:
                self.model = YOLO(model_path)
                self.output_text.setText(f"✅ 模型加载成功: {os.path.basename(model_path)}")
            except Exception as e:
                self.output_text.setText(f"模型加载失败: {str(e)}")

    # ========== 图片检测 ==========
    def select_image(self):
        if self.is_detecting:
            QMessageBox.warning(self, "提示", "请先停止当前检测任务!")
            return
        if not self.model:
            QMessageBox.warning(self, "提示", "请先加载模型!")
            return
        image_path, _ = QFileDialog.getOpenFileName(
            self, "选择图片文件", "", "图片文件 (*.jpg *.jpeg *.png *.bmp)"
        )
        if image_path:
            self.current_detection_type = "image"
            self.detect_image(image_path)

    def detect_image(self, image_path):
        self.clear_display()
        image = cv2.imread(image_path)
        if image is None:
            self.output_text.setText("❌ 图片读取失败!")
            return

        results = self.model.predict(
            image,
            conf=GlobalConfig.CONF_THRESHOLD,
            iou=GlobalConfig.IOU_THRESHOLD
        )
        if results:
            annotated = results[0].plot()
            self.current_annotated_image = annotated
            self.current_results = results[0]
            self.update_image_display(image, annotated)
            self.display_statistics(results[0])
        else:
            self.output_text.setText("检测失败")

    # ========== 文件夹检测 ==========
    def detect_folder(self):
        if self.is_detecting:
            QMessageBox.warning(self, "提示", "请先停止当前检测任务!")
            return
        if not self.model:
            QMessageBox.warning(self, "提示", "请先加载模型!")
            return

        folder_path = QFileDialog.getExistingDirectory(self, "选择图片文件夹")
        if not folder_path:
            return

        output_dir = QFileDialog.getExistingDirectory(self, "选择保存检测结果的文件夹")
        if not output_dir:
            QMessageBox.information(self, "提示", "未选择保存路径,将不保存检测结果。")
            return

        self.clear_display()
        self.is_detecting = True
        self.current_detection_type = "folder"

        self.folder_thread = FolderDetectThread(self.model, folder_path, output_dir)
        self.folder_thread.progress_signal.connect(
            lambda cur, total: self.output_text.append(f"进度: {cur}/{total}")
        )
        self.folder_thread.image_result_signal.connect(self.on_folder_image_result)
        self.folder_thread.info_signal.connect(self.output_text.append)
        self.folder_thread.finished_signal.connect(self.task_finish)
        self.folder_thread.start()

    def on_folder_image_result(self, original, annotated, result_obj):
        self.current_annotated_image = annotated
        self.current_results = result_obj
        self.update_image_display(original, annotated)
        self.display_statistics(result_obj)

    # ========== 视频检测 ==========
    def select_video(self):
        if self.is_detecting:
            QMessageBox.warning(self, "提示", "请先停止当前检测任务!")
            return
        if not self.model:
            QMessageBox.warning(self, "提示", "请先加载模型!")
            return

        video_path, _ = QFileDialog.getOpenFileName(
            self, "选择视频文件", "", "视频文件 (*.mp4 *.avi *.mov)"
        )
        if not video_path:
            return

        output_path = QFileDialog.getSaveFileName(
            self, "保存检测视频", "detected_video.mp4", "MP4 (*.mp4)"
        )[0]

        self.current_detection_type = "video"
        self.start_detection_thread("video", video_path, output_path)

    # ========== 摄像头检测 ==========
    def start_camera(self):
        if self.is_detecting:
            QMessageBox.warning(self, "提示", "请先停止当前检测任务!")
            return
        if not self.model:
            QMessageBox.warning(self, "提示", "请先加载模型!")
            return

        output_path = QFileDialog.getSaveFileName(
            self, "保存摄像头检测视频", "camera_detected.mp4", "MP4 (*.mp4)"
        )[0]

        self.current_detection_type = "camera"
        self.start_detection_thread("camera", None, output_path)

    def start_detection_thread(self, source_type, source_path=None, output_video_path=None):
        self.clear_display()
        self.is_detecting = True
        self.current_detection_type = source_type
        self.detect_thread = VideoDetectThread(
            self.model, source_type, source_path, output_video_path
        )
        self.detect_thread.frame_signal.connect(self.update_video_frame)
        self.detect_thread.info_signal.connect(self.output_text.append)
        self.detect_thread.finished_signal.connect(self.task_finish)
        self.detect_thread.start()

    def update_video_frame(self, frame_list):
        origin, annotated = frame_list
        self.current_annotated_image = annotated
        self.update_image_display(origin, annotated)

    # ========== 统一保存入口 ==========
    def save_detection(self):
        if self.current_detection_type == "image":
            if self.current_annotated_image is not None:
                file_name, _ = QFileDialog.getSaveFileName(
                    self, "保存检测图片", "", "JPEG (*.jpg);;PNG (*.png)"
                )
                if file_name:
                    cv2.imwrite(file_name, self.current_annotated_image)
                    QMessageBox.information(self, "成功", "图片保存完成!")
            else:
                QMessageBox.information(self, "提示", "没有可保存的检测结果")
        elif self.current_detection_type in ["folder", "video", "camera"]:
            QMessageBox.information(
                self, "提示",
                "文件夹/视频/摄像头检测的结果已在任务开始时自动保存到您指定的位置。\n"
                "如需额外保存当前画面,请使用截图功能。"
            )
        else:
            QMessageBox.information(self, "提示", "请先进行检测")

    # ========== 停止与退出 ==========
    def stop_all_detect(self):
        if self.detect_thread and self.detect_thread.isRunning():
            self.detect_thread.stop_task()
        if self.folder_thread and self.folder_thread.isRunning():
            self.folder_thread.stop_task()
        self.is_detecting = False
        self.output_text.append("⏹️ 已发送停止信号")

    def task_finish(self):
        self.is_detecting = False
        self.output_text.append("✅ 检测任务已完成")

    def exit_application(self):
        self.stop_all_detect()
        self.close()

脑启社区是一个专注类脑智能领域的开发者社区。欢迎加入社区,共建类脑智能生态。社区为开发者提供了丰富的开源类脑工具软件、类脑算法模型及数据集、类脑知识库、类脑技术培训课程以及类脑应用案例等资源。
更多推荐

 6
6 0
0- 0


 已为社区贡献1条内容

所有评论(0)