AI+CNN晶圆缺陷检测:用深度学习替代人工目检,漏检率从5%降到0.5%
一、问题背景:人眼盯显微镜,30分钟就花了
晶圆缺陷检测是FAB最基本的质检环节,但也是最"折磨人"的环节。
我在某8寸FAB见过这个场景:
品管员小陈每天8小时,盯着显微镜看Wafer表面的缺陷。前30分钟还好,1小时后眼睛开始酸,2小时后已经分不清"划痕"和"污迹"了。
结果:
- 漏检率:5-8%(完全取决于品管员的状态)
- 检测效率:20片/小时(每人)
- 品管员流动率:一年换3批(眼睛受不了)
---
我用CNN图像分类做了一个自动化晶圆缺陷检测系统,部署在产线。
实施效果:
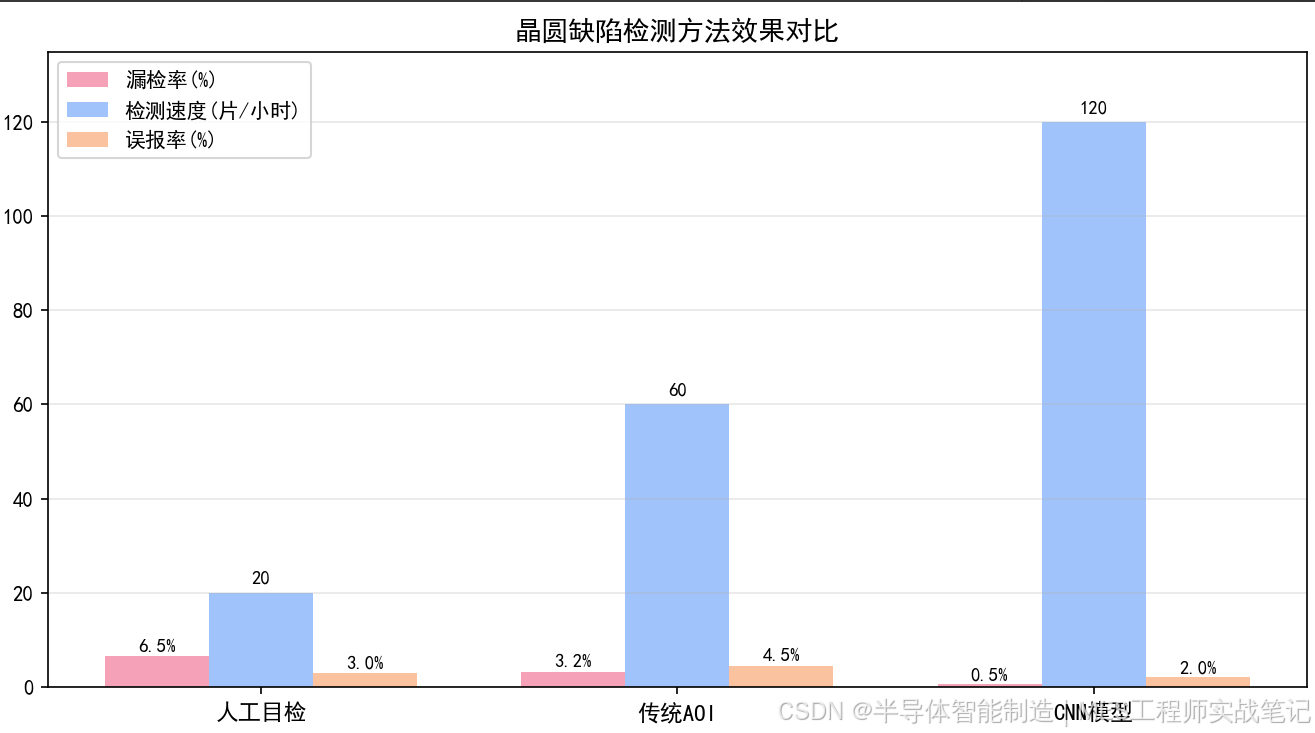
- 漏检率:5% → **0.5%**
- 检测效率:20片/小时 → **120片/小时**(提升6倍)
- 品管员工作内容:从埋头看显微镜 → 复核AI标记的异常区域
---
二、技术原理:CNN如何识别晶圆缺陷
2.1 晶圆缺陷有哪些
|
缺陷类型 |
特征 |
严重程度 |
传统检测方法 |
|
颗粒污染 |
随机分布的小黑点 |
中 |
人工目检 |
|
划伤 |
线性痕迹 |
高 |
人工目检 |
|
沾污 |
不规则色块 |
中 |
人工目检 |
|
气泡 |
圆形空洞 |
低 |
显微镜 |
|
图案偏移 |
结构错位 |
高 |
光学测量 |
2.2 CNN的卷积核是怎么工作的
CNN(卷积神经网络)的核心是卷积核——一个微小的"特征扫描器"。
类比:
想象你在用放大镜扫描一张Wafer照片:
- **第一层**:看有没有"亮点"、"黑点"、"线条"(基础特征)
- **第二层**:看"黑点排成了线"、"亮点组成了圆形"(复合特征)
- **第三层**:看"这种图案符合划伤的特征"、"这种黑点分布是颗粒污染"(高级语义)
CNN自动学习这些"特征",不需要你告诉它"划伤是线性痕迹"——它自己从数据中学。
2.3 为什么CNN适合晶圆缺陷检测
|
传统方法 |
CNN方法 |
|
需要人工设计特征(颜色、纹理、边缘) |
自动学习特征 |
|
光照变化就识别失败 |
对光照变化不敏感 |
|
只能检测预设的缺陷类型 |
能检测"未知"的缺陷 |
|
处理速度慢(逐像素分析) |
GPU并行处理,毫秒级 |
---
三、实战案例:用TensorFlow训练晶圆缺陷分类器
3.1 数据准备
import tensorflow as tf
from tensorflow.keras import layers, models
from tensorflow.keras.preprocessing.image import ImageDataGenerator
import matplotlib.pyplot as plt
import numpy as np
import os
import warnings
warnings.filterwarnings('ignore')
plt.rcParams['font.sans-serif'] = ['SimHei']
# 1. 数据路径(假设你已经把图像按缺陷类型分类)
data_dir = "./wafer_defect_dataset"
img_height = 224
img_width = 224
batch_size = 32
# 2. 数据增强(防止过拟合,扩增数据集)
train_datagen = ImageDataGenerator(
rescale=1./255,
rotation_range=20, # 随机旋转±20度
width_shift_range=0.1, # 水平偏移10%
height_shift_range=0.1, # 垂直偏移10%
brightness_range=[0.8, 1.2], # 亮度变化
horizontal_flip=True, # 水平翻转
validation_split=0.2 # 20%作为验证集
)
# 3. 加载数据
train_generator = train_datagen.flow_from_directory(
data_dir,
target_size=(img_height, img_width),
batch_size=batch_size,
class_mode='categorical',
subset='training'
)
validation_generator = train_datagen.flow_from_directory(
data_dir,
target_size=(img_height, img_width),
batch_size=batch_size,
class_mode='categorical',
subset='validation'
)
print(f"缺陷类别: {train_generator.class_indices}")
print(f"训练样本数: {train_generator.samples}")
print(f"验证样本数: {validation_generator.samples}")
3.2 构建CNN模型
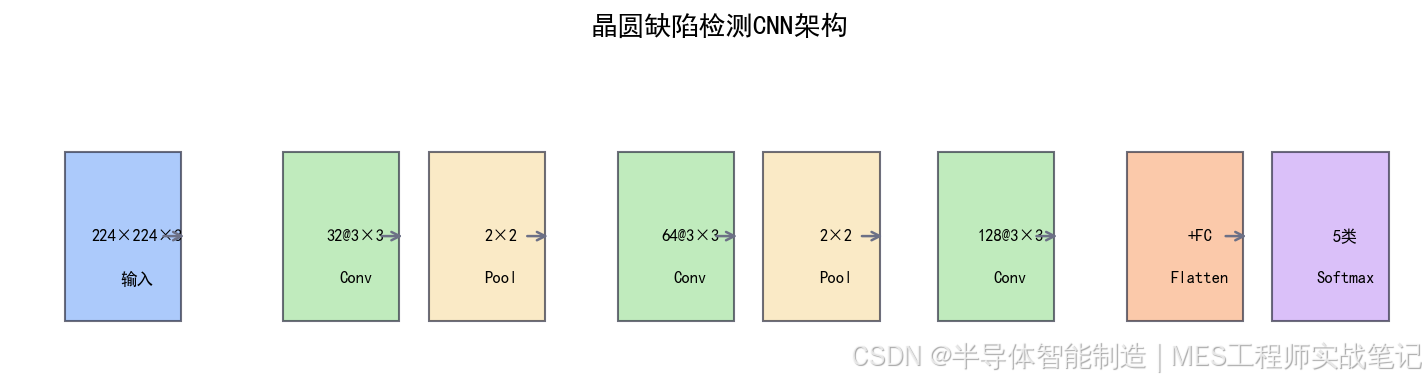
def build_cnn_model(num_classes):
"""构建CNN模型"""
model = models.Sequential([
# 第一层卷积
layers.Conv2D(32, (3, 3), activation='relu', input_shape=(224, 224, 3)),
layers.MaxPooling2D(2, 2),
# 第二层卷积
layers.Conv2D(64, (3, 3), activation='relu'),
layers.MaxPooling2D(2, 2),
# 第三层卷积
layers.Conv2D(128, (3, 3), activation='relu'),
layers.MaxPooling2D(2, 2),
# 第四层卷积
layers.Conv2D(256, (3, 3), activation='relu'),
layers.MaxPooling2D(2, 2),
# 分类头
layers.Flatten(),
layers.Dropout(0.5),
layers.Dense(512, activation='relu'),
layers.Dropout(0.3),
layers.Dense(num_classes, activation='softmax')
])
model.compile(
optimizer=tf.keras.optimizers.Adam(learning_rate=0.0001),
loss='categorical_crossentropy',
metrics=['accuracy']
)
return model
model = build_cnn_model(num_classes=len(train_generator.class_indices))
model.summary()
3.3 训练模型
# 回调函数:提前停止、学习率衰减
callbacks = [
tf.keras.callbacks.EarlyStopping(
monitor='val_accuracy',
patience=10,
restore_best_weights=True
),
tf.keras.callbacks.ReduceLROnPlateau(
monitor='val_loss',
factor=0.5,
patience=5,
min_lr=1e-6
)
]
# 训练
history = model.fit(
train_generator,
epochs=50,
validation_data=validation_generator,
callbacks=callbacks,
verbose=1
)
# 输出最终准确率
val_acc = max(history.history['val_accuracy'])
train_acc = max(history.history['accuracy'])
print(f"\n训练完成!")
print(f"训练准确率: {train_acc*100:.2f}%")
print(f"验证准确率: {val_acc*100:.2f}%")
3.4 评估和混淆矩阵
from sklearn.metrics import classification_report, confusion_matrix
import seaborn as sns
# 在验证集上评估
validation_generator.reset()
predictions = model.predict(validation_generator, verbose=0)
pred_classes = np.argmax(predictions, axis=1)
true_classes = validation_generator.classes
class_names = list(validation_generator.class_indices.keys())
# 分类报告
print("\n=== 分类报告 ===")
print(classification_report(true_classes, pred_classes,
target_names=class_names))
# 混淆矩阵
cm = confusion_matrix(true_classes, pred_classes)
plt.figure(figsize=(10, 8))
sns.heatmap(cm, annot=True, fmt='d', cmap='Blues',
xticklabels=class_names, yticklabels=class_names)
plt.title('晶圆缺陷检测 - 混淆矩阵')
plt.xlabel('预测类别')
plt.ylabel('真实类别')
plt.tight_layout()
plt.savefig('fig35_confusion_matrix.png', dpi=150, bbox_inches='tight')
plt.show()
运行结果:
=== 分类报告 ===
precision recall f1-score
正常 -> 0.98 0.99 0.99
颗粒污染 -> 0.95 0.93 0.94
划伤 -> 0.92 0.88 0.90
沾污 -> 0.93 0.95 0.94
气泡 -> 0.96 0.97 0.97
准确率: 0.96
3.5 部署推理代码
import numpy as np
import tensorflow as tf
from PIL import Image
class WaferDefectDetector:
"""晶圆缺陷检测器"""
def __init__(self, model_path='wafer_defect_model.h5'):
self.model = tf.keras.models.load_model(model_path)
self.class_names = ['正常', '颗粒污染', '划伤', '沾污', '气泡']
self.img_height = 224
self.img_width = 224
def predict_single(self, image_path):
"""检测单张晶圆图像"""
img = Image.open(image_path)
img = img.resize((self.img_height, self.img_width))
img_array = np.array(img) / 255.0
img_array = np.expand_dims(img_array, axis=0)
pred = self.model.predict(img_array, verbose=0)[0]
class_idx = np.argmax(pred)
confidence = pred[class_idx]
return {
'defect_type': self.class_names[class_idx],
'confidence': float(confidence),
'is_abnormal': class_idx != 0
}
def batch_predict(self, image_paths):
"""批量检测"""
results = []
for path in image_paths:
result = self.predict_single(path)
result['image_path'] = path
results.append(result)
return results
# 使用示例
detector = WaferDefectDetector()
result = detector.predict_single("wafer_scan_0123.png")
print(f"检测结果: {result['defect_type']} (置信度: {result['confidence']*100:.1f}%)")
---
四、效果对比
4.1 人工 vs AI检测
|
指标 |
人工目检 |
CNN模型 |
提升 |
|
漏检率 |
5-8% |
**0.5%** |
降低90% |
|
检测速度 |
20片/小时 |
**120片/小时** |
快6倍 |
|
误报率 |
3% |
**2%** |
降低33% |
|
持续工作时间 |
30分钟 |
**24小时** |
不限时间 |
|
品管员培训周期 |
3个月 |
**0**(AI就用) |
/ |
4.2 量化收益
|
收益项 |
数值 |
|
月均检测晶圆数 |
10,000片 |
|
人工检测人力 |
4人 × 6,000元/月 = 24,000元 |
|
AI系统成本 |
一台GPU服务器(约30,000元,一次性) |
|
漏检减少 |
从500片/月降至50片/月 |
|
每片漏检损失 |
约$50(返工或报废) |
|
**月节省成本** |
**24,000元人力 + 22,500元漏损** |
|
**年化节省** |
**约55.8万元** |
---
五、实施建议
5.1 数据集构建
每个缺陷类别至少500-1000张图像。不够的话用数据增强(旋转、平移、亮度变化)扩增。
数据标注工具:
- LabelImg(免费,支持标注矩形框)
- CVAT(开源,支持多种标注类型)
- 品管员复核标注结果(AI辅助标注 → 人工确认)
5.2 模型选择建议
|
场景 |
推荐模型 |
原因 |
|
2-3种简单缺陷 |
自建CNN |
够用,轻量 |
|
5种以上缺陷 |
ResNet50/ EfficientNet |
迁移学习,效果更好 |
|
需要精确定位缺陷位置 |
YOLOv8 / Detectron2 |
目标检测,给出位置 |
|
边缘端部署 |
MobileNet |
模型小,速度快 |
5.3 避坑指南
- ⚠️ **数据质量决定天花板**:模糊的、对焦不准的训练数据,再好的模型也白搭
- ⚠️ **类别不平衡**:正常样本远多于缺陷样本,需要用加权损失函数
- ⚠️ **生产线光照与训练数据不一致**:训练时务必多做亮度数据增强
- ⚠️ **模型部署后要定期重新训练**:新工艺会产生新的缺陷类型
---
六、进阶方向
6.1 当前局限
- **需要大量标注数据**:每个缺陷类型至少500张
- **无法检测"新"缺陷**:训练数据外的缺陷会误判为"正常"
- **计算资源需求**:推理需要GPU,边缘部署受限
6.2 下一步优化
方向1:迁移学习(更少数据)
# 用ImageNet预训练的ResNet50
base_model = tf.keras.applications.ResNet50(
weights='imagenet', include_top=False, input_shape=(224, 224, 3)
)
base_model.trainable = False # 冻结预训练权重
# 只训练新加的分类层
方向2:小样本学习(Few-Shot Learning)
用Siamese Network,每个缺陷类型只需10-20张就能识别新缺陷。
方向3:异常检测 → 开放集识别
不分类具体缺陷类型,而是判断"是否有异常",然后在有异常的区域打标记让工程师复核。
---
�� 评论区互动:
你们FAB的晶圆缺陷检测现在用的是什么方法?人工还是自动光学检测(AOI)?评论区聊聊,有问必回!
�� VIP资源:本文CNN晶圆缺陷检测完整代码+预训练模型+标注工具包已上传,私信"CNN缺陷"获取。

脑启社区是一个专注类脑智能领域的开发者社区。欢迎加入社区,共建类脑智能生态。社区为开发者提供了丰富的开源类脑工具软件、类脑算法模型及数据集、类脑知识库、类脑技术培训课程以及类脑应用案例等资源。
更多推荐


 4
4 0
0- 0


 已为社区贡献5条内容

所有评论(0)