Neuralangelo复现
Neuralangelo提出的第一个创新数值梯度帮助全局表面都得到反向传播的优化,使得全局表面都变得比较光滑(DTU的63号场景的苹果没有那么凹陷,且表面更加平整光滑),第二个创新是通过对数值梯度的参数ϵ和哈希网格的分辨率进行渐进的优化,为的都是先识别出物体的整体形态(能够重建出植物枝干),然后在逐步细化,恢复出物体详细的纹理特征(N3底部枝干也能重建出来的原因),这两个创新极大的帮助了神经网络更
1、配置环境
创建如下配置的实例:
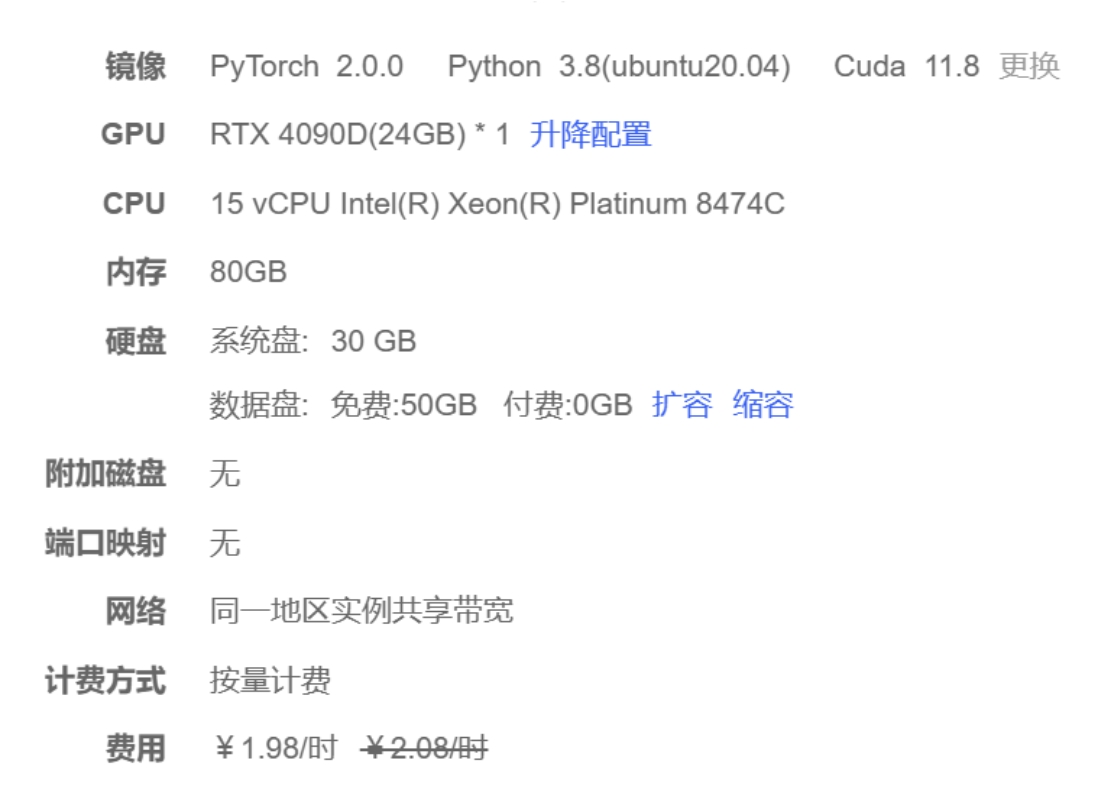
在正式配置环境之前,将该实例的pip源选择为清华源头(替换为清华源后需要将实例关机后重新开机):

将autodl-tmp/neuralangelo/neuralangelo.yaml文件中的python=3.8改为python=3.9,并指定cudatoolkit、numpy和pytorch的版本,以免后续发生版本不兼容的问题(因为不指定版本的话,他就会通过管道conda-forge、pytorch自己去安装一些杂七杂八的版本,最后导致不兼容,这里是根据现有的unbuntu20.04、cuda11.8、GPU4090D询问GPT指定的cudatoolkit、numpy和pytorch的版本),修改后如下:
name: neuralangelo
channels:
  - conda-forge
  - pytorch
dependencies:
  # general
  - gpustat
  - gdown
  - cudatoolkit=11.8
  - cmake
  # python general
  - python=3.9
  - pip
  - numpy>=1.21,<1.24
  - scipy
  - ipython
  - jupyterlab
  - cython
  - ninja
  - diskcache
  # pytorch
  - pytorch=2.0.0
  - torchvision
  - pip:
    - -r requirements.txt
将autodl-tmp/neuralangelo/requirements.txt文件中的安装tiny-cuda-nn的命令行注释掉,修改后如下:
addict
gdown
#git+https://github.com/NVlabs/tiny-cuda-nn/#subdirectory=bindings/torch
gpustat
icecream
imageio-ffmpeg
imutils
ipdb
k3d
kornia
lpips
matplotlib
mediapy
nvidia-ml-py3
open3d
opencv-python-headless
OpenEXR
pathlib
pillow
plotly
pyequilib
pyexr
PyMCubes
pyquaternion
pyyaml
requests
scikit-image
scikit-video
scipy
seaborn
tensorboard
termcolor
tqdm
trimesh
wandb
运行下述命令创建虚拟环境、安装所需要的依赖和软件包:
cd autodl-tmp
git clone https://github.com/NVlabs/neuralangelo.git
cd neuralangelo
conda env create --file neuralangelo.yaml
有以下输出信息证明安装成功:
Successfully installed Flask-3.0.3 OpenEXR-3.2.4 PyMCubes-0.1.6 absl-py-2.1.0 addict-2.4.0 blinker-1.8.2 click-8.1.7 configargparse-1.7 contourpy-1.2.1 cycler-0.12.1 dash-2.17.1 dash-core-components-2.0.0 dash-html-components-2.0.0 dash-table-5.0.0 docker-pycreds-0.4.0 fonttools-4.53.1 gitdb-4.0.11 gitpython-3.1.43 grpcio-1.65.5 icecream-2.1.3 imageio-2.35.1 imageio-ffmpeg-0.5.1 imutils-0.5.4 ipdb-0.13.13 ipywidgets-8.1.3 itsdangerous-2.2.0 joblib-1.4.2 jupyterlab-widgets-3.0.11 k3d-2.16.1 kiwisolver-1.4.5 kornia-0.7.3 kornia-rs-0.1.5 lazy-loader-0.4 lpips-0.1.4 markdown-3.7 matplotlib-3.9.2 mediapy-1.2.2 msgpack-1.0.8 nvidia-ml-py3-7.352.0 open3d-0.18.0 opencv-python-headless-4.10.0.84 pandas-2.2.2 pathlib-1.0.1 plotly-5.23.0 protobuf-5.27.3 pyequilib-0.5.8 pyexr-0.4.0 pyparsing-3.1.2 pyquaternion-0.9.9 retrying-1.3.4 scikit-image-0.24.0 scikit-learn-1.5.1 scikit-video-1.1.11 seaborn-0.13.2 sentry-sdk-2.13.0 setproctitle-1.3.3 smmap-5.0.1 tenacity-9.0.0 tensorboard-2.17.1 tensorboard-data-server-0.7.2 termcolor-2.4.0 threadpoolctl-3.5.0 tifffile-2024.8.10 traittypes-0.2.1 trimesh-4.4.6 tzdata-2024.1 wandb-0.17.7 werkzeug-3.0.3 widgetsnbextension-4.0.11

done
#
# To activate this environment, use
#
#     $ conda activate neuralangelo
#
# To deactivate an active environment, use
#
#     $ conda deactivate
然后运行下述命令激活neuralangelo环境:
conda activate neuralangelo
然后运行下述命令单独安装tinycuda-nn(tinycuda-nn安装经常出错,所以这里选择单独安装):
pip install git+https://github.com/NVlabs/tiny-cuda-nn/#subdirectory=bindings/torch
输入以下命令输出信息tiny-cuda-nn installed successfully,则证明tinycuda-nn安装成功:
python -c "import torch; from tinycudann import NetworkWithInputEncoding; print('tiny-cuda-nn installed successfully')"
2、准备DTU测试数据集
运行下述命令更新和初始化github仓库的colmap子模块:
git submodule update --init --recursive
执行以下命令,下载Neus作者预处理的DTU数据集,并生成json文件:
 PATH_TO_DTU=datasets/dtu  # 修改为DTU数据集根目录
 bash projects/neuralangelo/scripts/preprocess_dtu.sh ${PATH_TO_DTU}
运行上述命令显示无法连接到Dropbox进行数据集的下载,那么只好手动下载数据集,将网址https://www.dropbox.com/sh/w0y8bbdmxzik3uk/AAAaZffBiJevxQzRskoOYcyja?dl=1中NeuS作者预处理的DTU数据集neus.zip下载到本地,然后将neus.zip解压得到六个压缩包,将其中的data_dtu.zip上传至autodl的目录autodl-tmp/neuralangelo/datasets/dtu下(autodl-tmp/neuralangelo/datasets/dtu为自己创建的目录):

手动下载数据集后,运行下述命令进行解压,并将压缩包data_DTU.zip删除
 cd autodl-tmp/neuralangelo/datasets/dtu
 unzip data_DTU.zip
运行以下命令,生成json文件(该json文件格式与Instant-NPG的格式相同):
 cd autodl-tmp/neuralangelo
 python3 projects/neuralangelo/scripts/convert_dtu_to_json.py --dtu_path datasets/dtu
运行成功将输出以下信息:
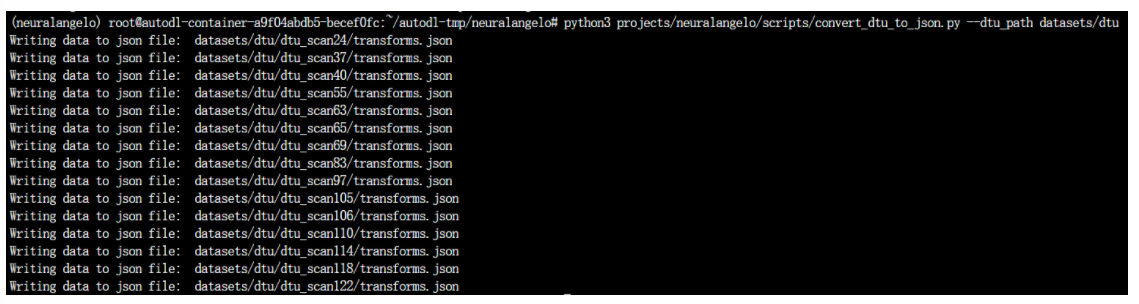
3、在DTU上训练Neuralangelo
将有关Neuralangelo训练DTU数据集的配置文件autodl-tmp/neuralangelo/projects/neuralangelo/configs/dtu.yaml修改如下:
# -----------------------------------------------------------------------------
# Copyright (c) 2023, NVIDIA CORPORATION. All rights reserved.
#
# NVIDIA CORPORATION and its licensors retain all intellectual property
# and proprietary rights in and to this software, related documentation
# and any modifications thereto. Any use, reproduction, disclosure or
# distribution of this software and related documentation without an express
# license agreement from NVIDIA CORPORATION is strictly prohibited.
# -----------------------------------------------------------------------------

_parent_: projects/neuralangelo/configs/base.yaml

model:
    object:
        sdf:
            mlp:
                inside_out: False
            encoding:
                coarse2fine:
                    init_active_level: 4
        s_var:
            init_val: 1.4
    appear_embed:
        enabled: False

data:
    type: projects.neuralangelo.data
    root: datasets/dtu/dtu_scan63#将这里的路径改为对应想训练的dtu数据集场景号
    train:
        image_size: [1200,1600]
        batch_size: 1
        subset:
    val:
        image_size: [300,400]
        batch_size: 1
        subset: 1
        max_viz_samples: 16
DTU测试数据集准备好之后就可以运行下述命令开始训练了:
EXPERIMENT=dtu
GROUP=dtu_group
NAME=dtu_scan63
CONFIG=projects/neuralangelo/configs/${EXPERIMENT}.yaml
GPUS=1  # use >1 for multi-GPU training!
torchrun --nproc_per_node=${GPUS} train.py \
    --logdir=logs/${GROUP}/${NAME} \
    --config=${CONFIG} \
    --show_pbar
直接运行上述命令会显示两个报错:第一个是 wandb 版本问题或初始化配置不正确的报错;第二个是多进程通信的报错,这可能与 GPU 资源分配或数据加载器的 pin_memory 选项有关。
针对于第一个问题,我想的是直接禁用wandb(WandB 是 "Weights and Biases" 的缩写,是一个用于机器学习实验管理的工具。它帮助开发者和研究人员跟踪、记录和可视化模型的训练过程。可以实验跟踪、数据可视化、模型管理、团队协作、报告生成等等),因为wandb只是一个帮助记录模型训练过程固定工具,相对于记录模型训练过程,我更想先能够让模型的训练过程能够成功的跑起来,所以需要在autodl-tmp/neuralangelo/projects/neuralangelo/configs/base.yaml、autodl-tmp/neuralangelo/train.py和autodl-tmp/neuralangelo/projects/neuralangelo/trainer.py中进行对应的修改,禁用wandb。
针对于第二个问题可以尝试在配置中禁用 pin_memory,或者减少 num_workers 的数量,特别是在数据加载部分,所以需要在base.yaml中进行修改。
以下是修改后的autodl-tmp/neuralangelo/train.py:
'''
-----------------------------------------------------------------------------
Copyright (c) 2023, NVIDIA CORPORATION. All rights reserved.

NVIDIA CORPORATION and its licensors retain all intellectual property
and proprietary rights in and to this software, related documentation
and any modifications thereto. Any use, reproduction, disclosure or
distribution of this software and related documentation without an express
license agreement from NVIDIA CORPORATION is strictly prohibited.
-----------------------------------------------------------------------------
'''

import argparse
import os

import imaginaire.config
from imaginaire.config import Config, recursive_update_strict, parse_cmdline_arguments
from imaginaire.utils.cudnn import init_cudnn
from imaginaire.utils.distributed import init_dist, get_world_size, master_only_print as print, is_master
from imaginaire.utils.gpu_affinity import set_affinity
from imaginaire.trainers.utils.logging import init_logging
from imaginaire.trainers.utils.get_trainer import get_trainer
from imaginaire.utils.set_random_seed import set_random_seed


def parse_args():
    parser = argparse.ArgumentParser(description='Training')
    parser.add_argument('--config', help='Path to the training config file.', required=True)
    parser.add_argument('--logdir', help='Dir for saving logs and models.', default=None)
    parser.add_argument('--checkpoint', default=None, help='Checkpoint path.')
    parser.add_argument('--seed', type=int, default=0, help='Random seed.')
    parser.add_argument('--local_rank', type=int, default=os.getenv('LOCAL_RANK', 0))
    parser.add_argument('--single_gpu', action='store_true')
    parser.add_argument('--debug', action='store_true')
    parser.add_argument('--profile', action='store_true')
    parser.add_argument('--show_pbar', action='store_true')
    parser.add_argument('--wandb', action='store_true', help="Enable using Weights & Biases as the logger")
    #parser.add_argument('--wandb_name', default='default', type=str)
    parser.add_argument('--resume', action='store_true')
    args, cfg_cmd = parser.parse_known_args()
    return args, cfg_cmd


def main():
    args, cfg_cmd = parse_args()
    set_affinity(args.local_rank)
    cfg = Config(args.config)

    cfg_cmd = parse_cmdline_arguments(cfg_cmd)
    recursive_update_strict(cfg, cfg_cmd)

    # If args.single_gpu is set to True, we will disable distributed data parallel.
    if not args.single_gpu:
        # this disables nccl timeout
        os.environ["NCLL_BLOCKING_WAIT"] = "0"
        os.environ["NCCL_ASYNC_ERROR_HANDLING"] = "0"
        cfg.local_rank = args.local_rank
        init_dist(cfg.local_rank, rank=-1, world_size=-1)
    print(f"Training with {get_world_size()} GPUs.")

    # set random seed by rank
    set_random_seed(args.seed, by_rank=True)

    # Global arguments.
    imaginaire.config.DEBUG = args.debug

    # Create log directory for storing training results.
    cfg.logdir = init_logging(args.config, args.logdir, makedir=True)

    # Print and save final config
    if is_master():
        cfg.print_config()
        cfg.save_config(cfg.logdir)

    # Initialize cudnn.
    init_cudnn(cfg.cudnn.deterministic, cfg.cudnn.benchmark)

    # Initialize data loaders and models.
    trainer = get_trainer(cfg, is_inference=False, seed=args.seed)
    trainer.set_data_loader(cfg, split="train")
    trainer.set_data_loader(cfg, split="val")
    trainer.checkpointer.load(args.checkpoint, args.resume, load_sch=True, load_opt=True)

    # Initialize Wandb.
    #trainer.init_wandb(cfg,
    #                   project=args.wandb_name,
    #                   mode="disabled" if args.debug or not args.wandb else "online",
    #                   resume=args.resume,
    #                   use_group=True)

    trainer.mode = 'train'
    # Start training.
    trainer.train(cfg,
                  trainer.train_data_loader,
                  single_gpu=args.single_gpu,
                  profile=args.profile,
                  show_pbar=args.show_pbar)

    # Finalize training.
    trainer.finalize(cfg)


if __name__ == "__main__":
    main()
以下是修改后的autodl-tmp/neuralangelo/projects/neuralangelo/configs/base.yaml:
# -----------------------------------------------------------------------------
# Copyright (c) 2023, NVIDIA CORPORATION. All rights reserved.
#
# NVIDIA CORPORATION and its licensors retain all intellectual property
# and proprietary rights in and to this software, related documentation
# and any modifications thereto. Any use, reproduction, disclosure or
# distribution of this software and related documentation without an express
# license agreement from NVIDIA CORPORATION is strictly prohibited.
# -----------------------------------------------------------------------------

logging_iter: 9999999999999  # disable the printing logger

max_iter: 500000

wandb_scalar_iter: 9999999999
wandb_image_iter: 9999999999
validation_iter: 5000
speed_benchmark: False

checkpoint:
    save_iter: 20000

trainer:
    type: projects.neuralangelo.trainer
    ema_config:
        enabled: False
        load_ema_checkpoint: False
    loss_weight:
        render: 1.0
        eikonal: 0.1
        curvature: 5e-4
    init:
        type: none
    amp_config:
        enabled: False
    depth_vis_scale: 0.5

model:
    type: projects.neuralangelo.model
    object:
        sdf:
            mlp:
                num_layers: 1
                hidden_dim: 256
                skip: []
                activ: softplus
                activ_params:
                    beta: 100
                geometric_init: True
                weight_norm: True
                out_bias: 0.5
                inside_out: False
            encoding:
                type: hashgrid
                levels: 16
                hashgrid:
                    min_logres: 5
                    max_logres: 11
                    dict_size: 22
                    dim: 8
                    range: [-2,2]
                coarse2fine:
                    enabled: True
                    init_active_level: 4
                    step: 5000
            gradient:
                mode: numerical
                taps: 4
        rgb:
            mlp:
                num_layers: 4
                hidden_dim: 256
                skip: []
                activ: relu_
                activ_params: {}
                weight_norm: True
            mode: idr
            encoding_view:
                type: spherical
                levels: 3
        s_var:
            init_val: 3.
            anneal_end: 0.1
    background:
        enabled: True
        white: False
        mlp:
            num_layers: 8
            hidden_dim: 256
            skip: [4]
            num_layers_rgb: 2
            hidden_dim_rgb: 128
            skip_rgb: []
            activ: relu
            activ_params: {}
            activ_density: softplus
            activ_density_params: {}
        view_dep: True
        encoding:
            type: fourier
            levels: 10
        encoding_view:
            type: spherical
            levels: 3
    render:
        rand_rays: 512
        num_samples:
            coarse: 64
            fine: 16
            background: 32
        num_sample_hierarchy: 4
        stratified: True
    appear_embed:
        enabled: False
        dim: 8

optim:
    type: AdamW
    params:
        lr: 1e-3
        weight_decay: 1e-2
    sched:
        iteration_mode: True
        type: two_steps_with_warmup
        warm_up_end: 5000
        two_steps: [300000,400000]
        gamma: 10.0

data:
    type: projects.nerf.datasets.nerf_blender
    root: datasets/nerf-synthetic/lego
    use_multi_epoch_loader: True
    num_workers: 2
    preload: False
    num_images:  # The number of training images.
    train:
        image_size: [800,800]
        batch_size: 2
        subset:
    val:
        image_size: [400,400]
        batch_size: 2
        subset: 4
        max_viz_samples: 16
    readjust:
        center: [0.,0.,0.]
        scale: 1.
以下是修改后的autodl-tmp/neuralangelo/projects/neuralangelo/trainer.py:
'''
-----------------------------------------------------------------------------
Copyright (c) 2023, NVIDIA CORPORATION. All rights reserved.

NVIDIA CORPORATION and its licensors retain all intellectual property
and proprietary rights in and to this software, related documentation
and any modifications thereto. Any use, reproduction, disclosure or
distribution of this software and related documentation without an express
license agreement from NVIDIA CORPORATION is strictly prohibited.
-----------------------------------------------------------------------------
'''

import torch
import torch.nn.functional as torch_F
#import wandb

from imaginaire.utils.distributed import master_only
from imaginaire.utils.visualization import wandb_image
from projects.nerf.trainers.base import BaseTrainer
from projects.neuralangelo.utils.misc import get_scheduler, eikonal_loss, curvature_loss


class Trainer(BaseTrainer):

    def __init__(self, cfg, is_inference=True, seed=0):
        super().__init__(cfg, is_inference=is_inference, seed=seed)
        self.metrics = dict()
        self.warm_up_end = cfg.optim.sched.warm_up_end
        self.cfg_gradient = cfg.model.object.sdf.gradient
        if cfg.model.object.sdf.encoding.type == "hashgrid" and cfg.model.object.sdf.encoding.coarse2fine.enabled:
            self.c2f_step = cfg.model.object.sdf.encoding.coarse2fine.step
            self.model.module.neural_sdf.warm_up_end = self.warm_up_end

    def _init_loss(self, cfg):
        self.criteria["render"] = torch.nn.L1Loss()

    def setup_scheduler(self, cfg, optim):
        return get_scheduler(cfg.optim, optim)

    def _compute_loss(self, data, mode=None):
        if mode == "train":
            # Compute loss only on randomly sampled rays.
            self.losses["render"] = self.criteria["render"](data["rgb"], data["image_sampled"]) * 3  # FIXME:sumRGB?!
            self.metrics["psnr"] = -10 * torch_F.mse_loss(data["rgb"], data["image_sampled"]).log10()
            if "eikonal" in self.weights.keys():
                self.losses["eikonal"] = eikonal_loss(data["gradients"], outside=data["outside"])
            if "curvature" in self.weights:
                self.losses["curvature"] = curvature_loss(data["hessians"], outside=data["outside"])
        else:
            # Compute loss on the entire image.
            self.losses["render"] = self.criteria["render"](data["rgb_map"], data["image"])
            self.metrics["psnr"] = -10 * torch_F.mse_loss(data["rgb_map"], data["image"]).log10()

    def get_curvature_weight(self, current_iteration, init_weight):
        if "curvature" in self.weights:
            if current_iteration <= self.warm_up_end:
                self.weights["curvature"] = current_iteration / self.warm_up_end * init_weight
            else:
                model = self.model_module
                decay_factor = model.neural_sdf.growth_rate ** (model.neural_sdf.anneal_levels - 1)
                self.weights["curvature"] = init_weight / decay_factor

    def _start_of_iteration(self, data, current_iteration):
        model = self.model_module
        self.progress = model.progress = current_iteration / self.cfg.max_iter
        if self.cfg.model.object.sdf.encoding.coarse2fine.enabled:
            model.neural_sdf.set_active_levels(current_iteration)
            if self.cfg_gradient.mode == "numerical":
                model.neural_sdf.set_normal_epsilon()
                self.get_curvature_weight(current_iteration, self.cfg.trainer.loss_weight.curvature)
        elif self.cfg_gradient.mode == "numerical":
            model.neural_sdf.set_normal_epsilon()

        return super()._start_of_iteration(data, current_iteration)
    @master_only
    def log_wandb_scalars(self, data, mode="val"):
        # 禁用 wandb 的调用
        pass


    @master_only
    def log_wandb_images(self, data, mode="val",max_samples=None):
        # 禁用 wandb 的调用
        pass


    def train(self, cfg, data_loader, single_gpu=False, profile=False, show_pbar=False):
        self.progress = self.model_module.progress = self.current_iteration / self.cfg.max_iter
        super().train(cfg, data_loader, single_gpu, profile, show_pbar)
然后再次运行下述训练命令:
EXPERIMENT=dtu
GROUP=dtu_group
NAME=dtu_scan63
CONFIG=projects/neuralangelo/configs/${EXPERIMENT}.yaml
GPUS=1  # use >1 for multi-GPU training!
torchrun --nproc_per_node=${GPUS} train.py \
    --logdir=logs/${GROUP}/${NAME} \
    --config=${CONFIG} \
    --show_pbar
运行成功后有以下信息输出:
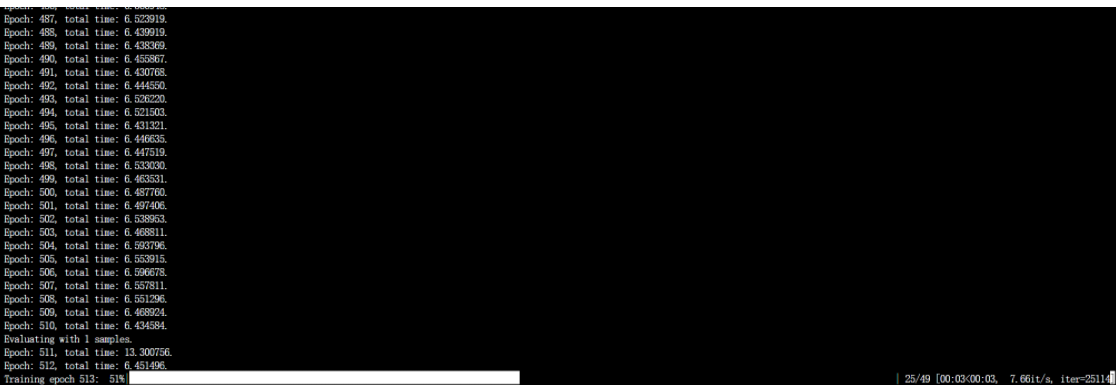
一共需要迭代50万次,一次6秒左右,因此在DTU数据集的63号场景上跑Neuralangelo模型大概需要18.7小时。训练完后输出的东西都存于autodl-tmp/neuralangelo/logs/dtu_group/dtu_scan63目录。
若训练过程突然中断,则可以执行下述命令继续在检查点文件上训练:
EXPERIMENT=dtu
GROUP=dtu_group
NAME=dtu_scan63
CONFIG=projects/neuralangelo/configs/${EXPERIMENT}.yaml
GPUS=1  # use >1 for multi-GPU training!
torchrun --nproc_per_node=${GPUS} train.py \
    --logdir=logs/${GROUP}/${NAME} \
    --config=${CONFIG} \
    --show_pbar\
    --checkpoint=logs/${GROUP}/${NAME}/xxx.pt\
    --resume
运行下述命令提取mesh表面:
CHECKPOINT=logs/dtu_group/dtu_scan63/epoch_10204_iteration_000500000_checkpoint.pt
OUTPUT_MESH=output/dtu_63.ply
CONFIG=logs/dtu_group/dtu_scan63/config.yaml
RESOLUTION=2048
BLOCK_RES=128
GPUS=1  # use >1 for multi-GPU mesh extraction
torchrun --nproc_per_node=${GPUS} projects/neuralangelo/scripts/extract_mesh.py \
    --config=${CONFIG} \
    --checkpoint=${CHECKPOINT} \
    --output_file=${OUTPUT_MESH} \
    --resolution=${RESOLUTION} \
    --block_res=${BLOCK_RES}
下面是DTU数据集63号场景提取的mesh:
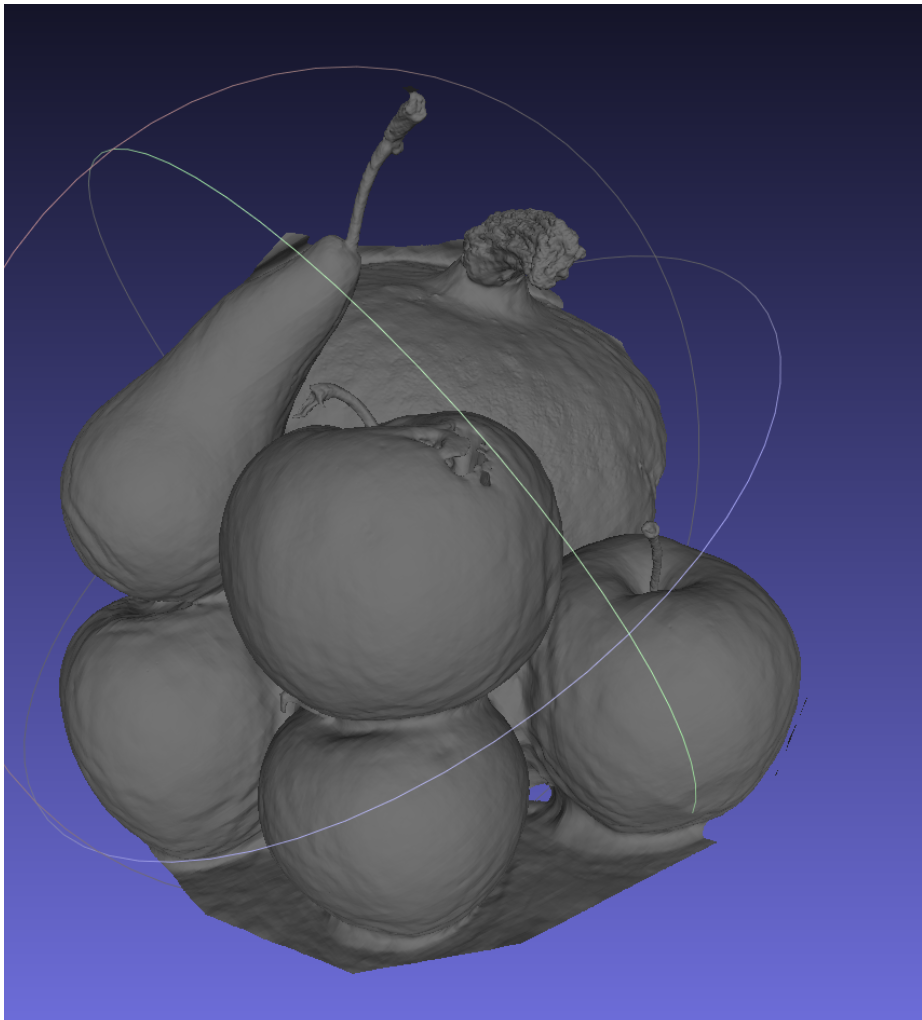
下图是Neus重建的DTU数据集63号场景:
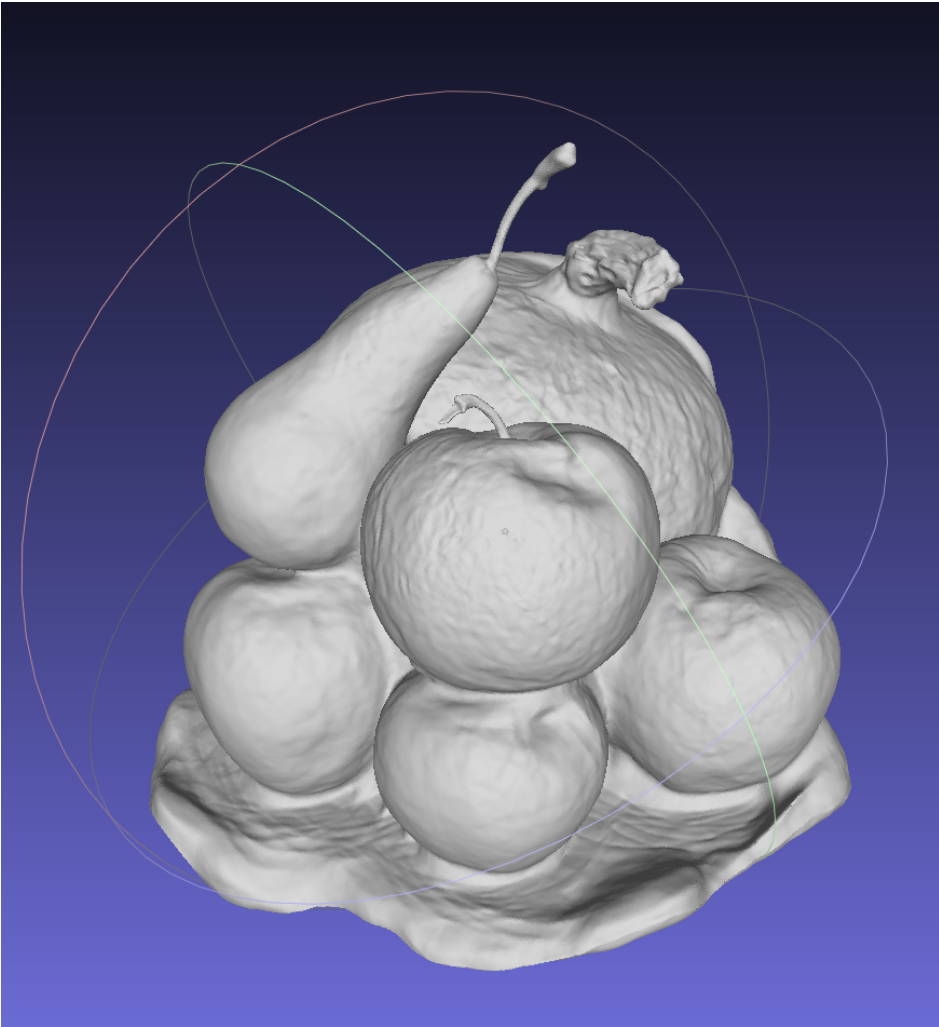
可以明显的看出两者的差别,Neuralangelo几乎把所有能看见的苹果枝干都重建出来了,而且苹果表面的凹陷没有那么严重,在几何质量方面是高于Neus的,这也应该是Neuralangelo点高的原因。
4、准备TNT测试数据集
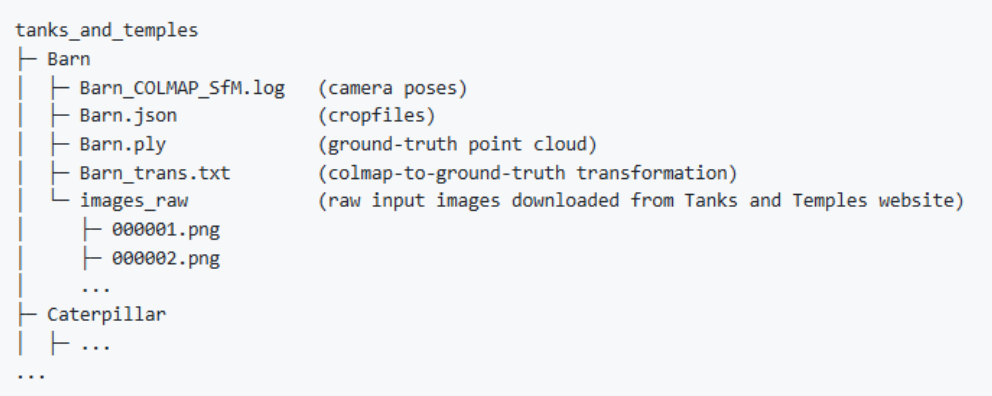
首先到网站Tanks and Temples Benchmark中下载Tanks and Temples数据集,文件结构应如下所示 (需要将下载的图像移动到文件夹 images_raw):
然后利用IrfanView软件将images_raw里面的图片进行重命名为000000.png、000001.png等等,并将格式由jpg转为png,并将TNT数据集中的各个场景的图像的分辨率都转换为宽1920,高1080的分辨率。
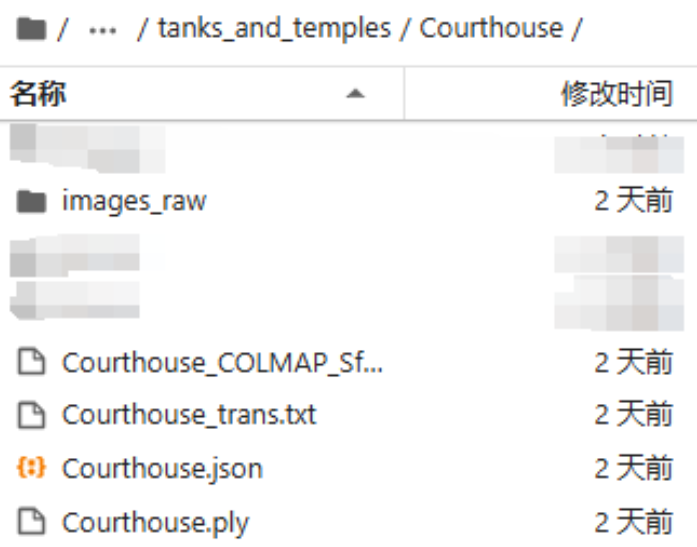
然后将这个文件夹压缩上传至“制作NeuS数据集”的服务器的autodl-tmp/neuralangelo/datasets/tanks_and_temples目录上面(tanks_and_temples/Barn目录需要自己创建,上传至这个服务器的原因是因为这个服务器中装了colmap,我尝试了重新装,但是又出现了报错,所以突发其想使用旧环境),并进行解压,如下图所示,为Tanks数据集中的法庭(Courthouse)数据集:
然后运行下述命令调用colmap预处理数据,并生成和Instant-NPG一样的json文件:
cd autodl-tmp/neuralangelo/datasets/tanks_and_temples
rm -rf .ipynb_checkpoints
cd Barn
rm -rf .ipynb_checkpoints
cd images_raw
rm -rf .ipynb_checkpoints
cd autodl-tmp/neuralangelo
PATH_TO_TNT=datasets/tanks_and_temples  # Modify this to be the Tanks and Temples root directory.
bash projects/neuralangelo/scripts/preprocess_tnt.sh ${PATH_TO_TNT}
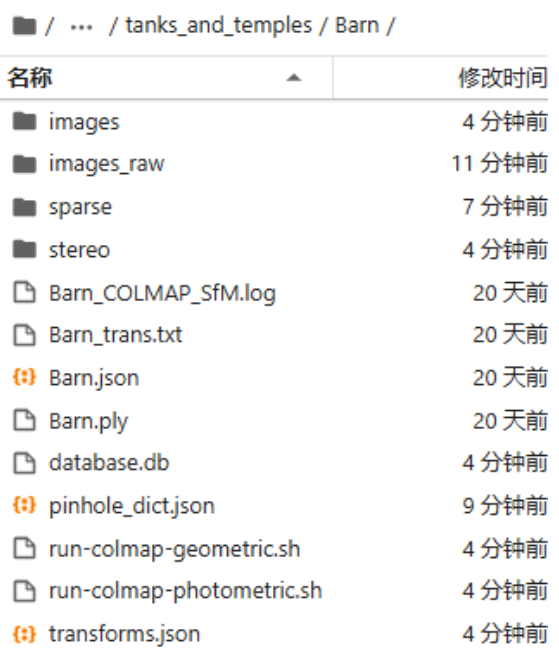
过程没有报错,并且最后输出信息中有writing …….to transform.json,那么Tanks数据集就预处理成功了。预处理成功后的有以下文件,,下述为Tank数据集中的谷场(Barn)数据集:
5、在TNT数据集上训练Neuralangelo
将有关Neuralangelo训练TNT数据集的配置文件autodl-tmp/neuralangelo/projects/neuralangelo/configs/tnt.yaml修改如下:
# -----------------------------------------------------------------------------
# Copyright (c) 2023, NVIDIA CORPORATION. All rights reserved.
#
# NVIDIA CORPORATION and its licensors retain all intellectual property
# and proprietary rights in and to this software, related documentation
# and any modifications thereto. Any use, reproduction, disclosure or
# distribution of this software and related documentation without an express
# license agreement from NVIDIA CORPORATION is strictly prohibited.
# -----------------------------------------------------------------------------

_parent_: projects/neuralangelo/configs/base.yaml

model:
    object:
        sdf:
            mlp:
                inside_out: False   # True for Meetingroom.
            encoding:
                coarse2fine:
                    init_active_level: 8
    appear_embed:
        enabled: True #开启外观嵌入变量,训练tnt数据集需要开启外观嵌入变量
        dim: 8

data:
    type: projects.neuralangelo.data
    root: datasets/tanks_and_temples/Barn#改为对应要训练的tnt数据集的地址
    num_images: 410  # 改为数据集图片的数量
    train:
        image_size: [1080,1920] #改为数据集的分辨率
        batch_size: 4 #TNT数据集的训练批次最好设置为16,且用多个GPU计算才能达到较好的效果
        subset:
    val:
        image_size: [300,540]
        batch_size: 4 #TNT数据集的评估批次最好设置为16,且用多个GPU计算才能达到较好的效果
        subset: 1
        max_viz_samples: 16
将有关Neuralangelo训练TNT数据集的配置文件autodl-tmp/neuralangelo/projects/neuralangelo/configs/base.yaml修改如下:
# -----------------------------------------------------------------------------
# Copyright (c) 2023, NVIDIA CORPORATION. All rights reserved.
#
# NVIDIA CORPORATION and its licensors retain all intellectual property
# and proprietary rights in and to this software, related documentation
# and any modifications thereto. Any use, reproduction, disclosure or
# distribution of this software and related documentation without an express
# license agreement from NVIDIA CORPORATION is strictly prohibited.
# -----------------------------------------------------------------------------

logging_iter: 9999999999999  # disable the printing logger

max_iter: 500000

wandb_scalar_iter: 100
wandb_image_iter: 10000
validation_iter: 5000
speed_benchmark: False

checkpoint:
    save_iter: 250000

trainer:
    type: projects.neuralangelo.trainer
    ema_config:
        enabled: False
        load_ema_checkpoint: False
    loss_weight:
        render: 1.0
        eikonal: 0.1
        curvature: 5e-4
    init:
        type: none
    amp_config:
        enabled: False
    depth_vis_scale: 0.5

model:
    type: projects.neuralangelo.model
    object:
        sdf:
            mlp:
                num_layers: 1
                hidden_dim: 256
                skip: []
                activ: softplus
                activ_params:
                    beta: 100
                geometric_init: True
                weight_norm: True
                out_bias: 0.5
                inside_out: False
            encoding:
                type: hashgrid
                levels: 16
                hashgrid:
                    min_logres: 5
                    max_logres: 11
                    dict_size: 22
                    dim: 8
                    range: [-2,2]
                coarse2fine:
                    enabled: True
                    init_active_level: 4
                    step: 5000
            gradient:
                mode: numerical
                taps: 4
        rgb:
            mlp:
                num_layers: 4
                hidden_dim: 256
                skip: []
                activ: relu_
                activ_params: {}
                weight_norm: True
            mode: idr
            encoding_view:
                type: spherical
                levels: 3
        s_var:
            init_val: 3.
            anneal_end: 0.1
    background:
        enabled: True
        white: False
        mlp:
            num_layers: 8
            hidden_dim: 256
            skip: [4]
            num_layers_rgb: 2
            hidden_dim_rgb: 128
            skip_rgb: []
            activ: relu
            activ_params: {}
            activ_density: softplus
            activ_density_params: {}
        view_dep: True
        encoding:
            type: fourier
            levels: 10
        encoding_view:
            type: spherical
            levels: 3
    render:
        rand_rays: 512
        num_samples:
            coarse: 64
            fine: 16
            background: 32
        num_sample_hierarchy: 4
        stratified: True
    appear_embed:
        enabled: True #开启外观变量,训练TNT数据集需要开启外观嵌入变量
        dim: 8

optim:
    type: AdamW
    params:
        lr: 1e-3
        weight_decay: 1e-2
    sched:
        iteration_mode: True
        type: two_steps_with_warmup
        warm_up_end: 5000
        two_steps: [300000,400000]
        gamma: 10.0

data:
    type: projects.nerf.datasets.nerf_blender
    root: datasets/tanks_and_temples/Barn #设置TNT数据集路径
    use_multi_epoch_loader: True
    num_workers: 2
    preload: False
    num_images: 410 #设置数据集中的图片数量
    train:
        image_size: [800,800]
        batch_size: 4 #TNT数据集的训练批次最好设置为16,且用多个GPU计算才能达到较好的效果
        subset:
    val:
        image_size: [400,400]
        batch_size: 4 #TNT数据集的训练批次最好设置为16,且用多个GPU计算才能达到较好的效果
        subset: 4
        max_viz_samples: 16
    readjust:
        center: [0.,0.,0.]
        scale: 1.
TNT测试数据集准备好之后就可以运行下述命令开始训练了(有颜色的模型训练提取需要参考Neuralangelo代码修改.md):
EXPERIMENT=tnt
GROUP=tnt_group
NAME=tnt_Barn
CONFIG=projects/neuralangelo/configs/${EXPERIMENT}.yaml
GPUS=8 #训练TNT数据集需要多个GPU

torchrun --nproc_per_node=${GPUS} train.py \
    --logdir=logs/${GROUP}/${NAME} \
    --config=${CONFIG} \
    --show_pbar \
    --wandb_name="Neuralangelo_Color" \
    --wandb
运行成功后有以下信息输出:

一共需要迭代50万次,一次两分钟左右,因为TNT数据集比较大,所以运行的时间很长,我估计得两天的时间。
若训练过程突然中断,则可以执行下述命令继续在检查点文件上训练:
EXPERIMENT=tnt
GROUP=tnt_group
NAME=tnt_Courthouse
CONFIG=projects/neuralangelo/configs/${EXPERIMENT}.yaml
GPUS=2  # use >1 for multi-GPU training!
torchrun --nproc_per_node=${GPUS} train.py \
    --logdir=logs/${GROUP}/${NAME} \
    --config=${CONFIG} \
    --show_pbar\
    --checkpoint=logs/${GROUP}/${NAME}/xxx.pt\
    --resume\
    --wandb_name="Neuralangelo_Color" \
    --wandb
运行下述命令提取mesh表面(有颜色的表面提取需要参考Neuralangelo代码修改.md):
CHECKPOINT=logs/tnt_group/tnt_Courthouse/epoch_00226_iteration_000250000_checkpoint.pt
OUTPUT_MESH=output/tnt_Courthouse.ply
CONFIG=logs/tnt_group/tnt_Courthouse/config.yaml
RESOLUTION=2048
BLOCK_RES=128
GPUS=6  # use >1 for multi-GPU mesh extraction
torchrun --nproc_per_node=${GPUS} projects/neuralangelo/scripts/extract_mesh.py \
    --config=${CONFIG} \
    --checkpoint=${CHECKPOINT} \
    --output_file=${OUTPUT_MESH} \
    --resolution=${RESOLUTION} \
    --block_res=${BLOCK_RES}
6、在大叶植物数据集上训练Neuralangelo
Neuralangelo使用的数据集格式和Neus一样,即如下几个文件:
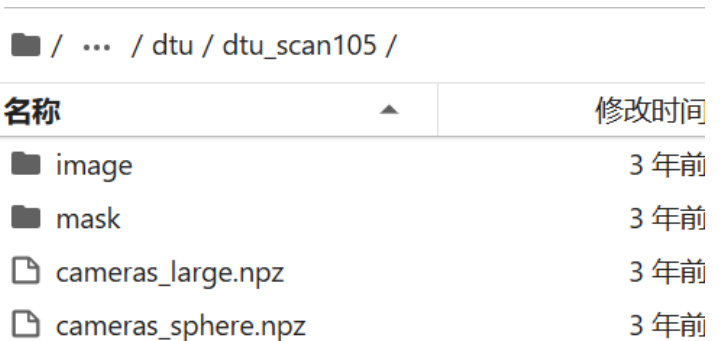
只不过Neuralangelo加入了Instant-NPG中的多分辨率哈希位置编码,所以还需要一个与Instant-NPG中相同的json文件,因此Neuralangelo使用的数据集格式如下:
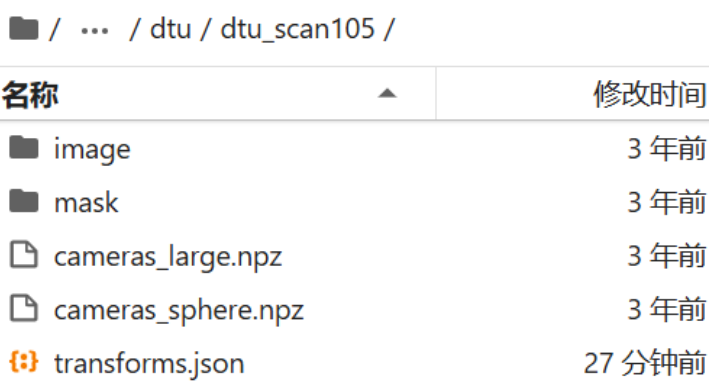
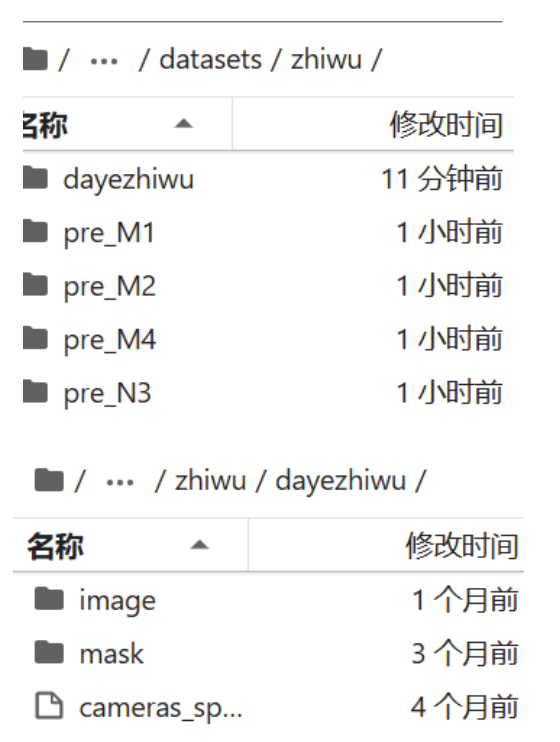
那么要制作Neuralangelo模型格式的植物数据集就很简单了,只需把之前Neus处理好的植物数据集拿过来,上传至目录autodl-tmp/neuralangelo/datasets/zhiwu:
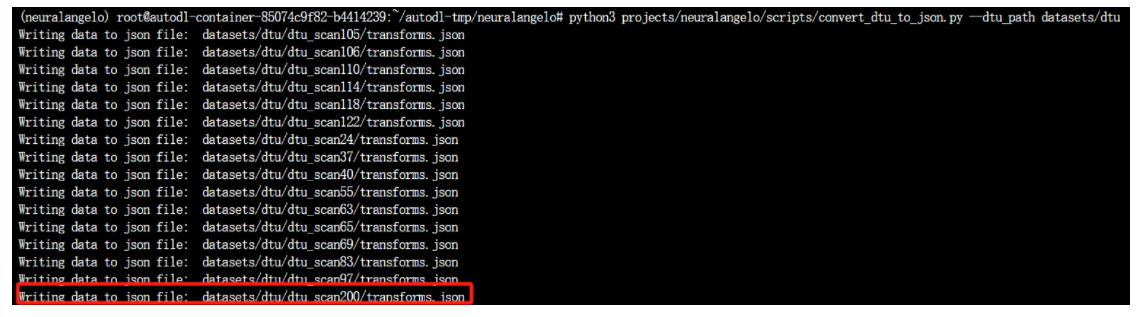
这时还差json文件,我决定采用生成DTU数据集json文件的方式生成植物数据集对应的json文件 ,首先将对应的植物数据集移至autodl-tmp/neuralangelo/datasets/dtu,并随便重新命名为dtu_sanxx(DTU没有的场景号),如dtu_scan200,然后运行下述命令生成对应植物数据集的json文件:
 cd autodl-tmp/neuralangelo
 python3 projects/neuralangelo/scripts/convert_dtu_to_json.py --dtu_path datasets/dtu
如下图可见dtu_scan200也生成了对应的json文件,dtu_scan200实际上是我们的植物数据集:
然后再将dtu_scan200重新移至目录autodl-tmp/neuralangelo/datasets/zhiwu,并将其重新命名为植物数据集的名字,这样一来Neuralangelo格式的大叶植物数据集就准备好了:
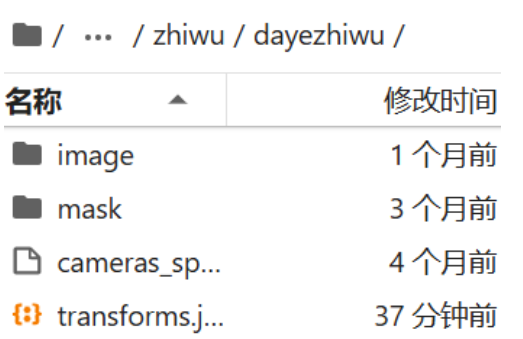
然后编写植物数据集对应的yaml配置文件autodl-tmp/neuralangelo/projects/neuralangelo/configs/zhiwu.yaml:
# your_plant_dataset.yaml _parent_: projects/neuralangelo/configs/base.yaml#各种类型的数据集配置文件都基于base.yaml model: object: sdf: mlp: inside_out: False encoding: coarse2fine: init_active_level: 4 s_var: init_val: 1.4 appear_embed: enabled: False data: type: projects.neuralangelo.data # 指定数据集处理模块 root: datasets/zhiwu/dayezhiwu # 指定数据集根目录 train: image_size: [1728,1152] # 根据植物数据集的图像大小调整 batch_size: 1 subset: # 如果使用部分数据集,指定子集 val: image_size: [300,400] batch_size: 1 subset: 1 max_viz_samples: 16
按照之前在DTU数据集上训练Neuralangelo模型那样修改文件autodl-tmp/neuralangelo/projects/neuralangelo/configs/base.yaml、autodl-tmp/neuralangelo/train.py和autodl-tmp/neuralangelo/projects/neuralangelo/trainer.py。
运行下述命令开始在大叶植物数据集上训练Neuralangelo模型:
 EXPERIMENT=zhiwu
 GROUP=zhiwu_group
 NAME=dayezhiwu
 CONFIG=projects/neuralangelo/configs/${EXPERIMENT}.yaml
 GPUS=1  # use >1 for multi-GPU training!
 torchrun --nproc_per_node=${GPUS} train.py \
     --logdir=logs/${GROUP}/${NAME} \
     --config=${CONFIG} \
     --show_pbar
运行下述命令提取mesh表面:
 CHECKPOINT=logs/zhiwu_group/N3/epoch_04098_iteration_000500000_checkpoint.pt
 OUTPUT_MESH=output/N3.ply
 CONFIG=logs/zhiwu_group/N3/config.yaml
 RESOLUTION=2048
 BLOCK_RES=128
 GPUS=1  # use >1 for multi-GPU mesh extraction
 torchrun --nproc_per_node=${GPUS} projects/neuralangelo/scripts/extract_mesh.py \
     --config=${CONFIG} \
     --checkpoint=${CHECKPOINT} \
     --output_file=${OUTPUT_MESH} \
     --resolution=${RESOLUTION} \
     --block_res=${BLOCK_RES}
一共需要迭代50万次,一次16秒左右,因此在DTU数据集的63号场景上跑Neuralangelo模型大概需要19.1小时。
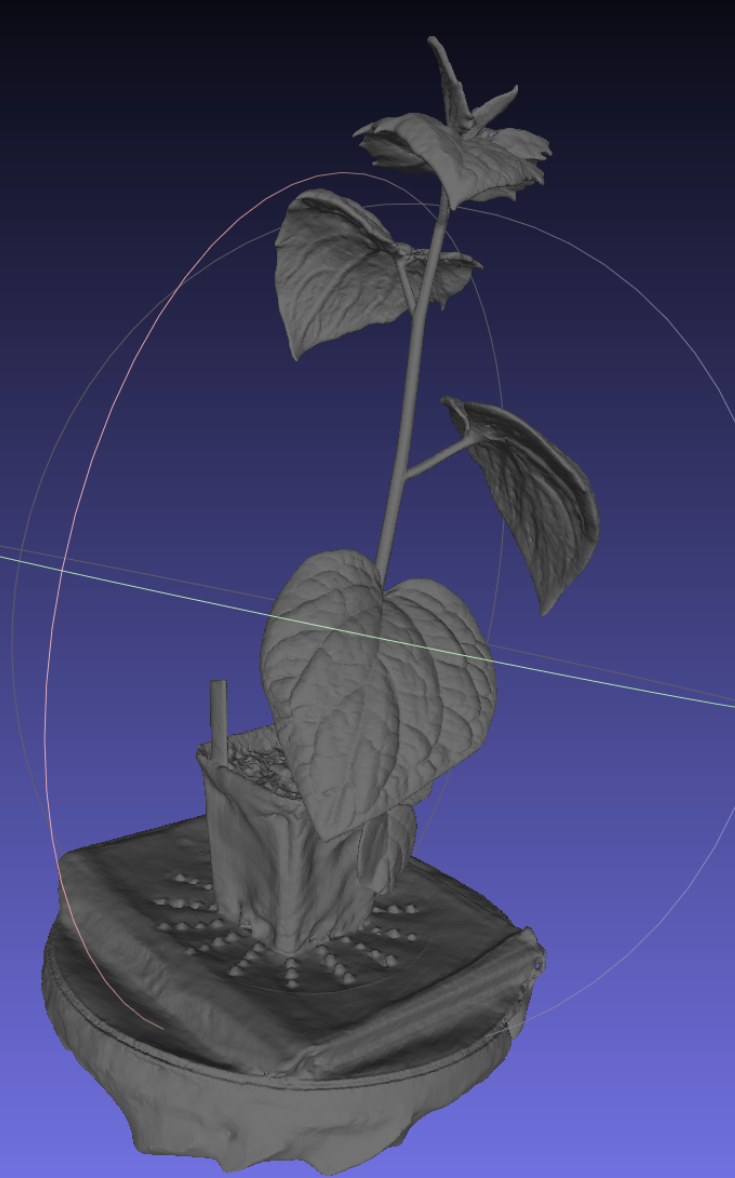
下面是大叶植物提取的mesh:
下述是Neus跑的大叶植物:
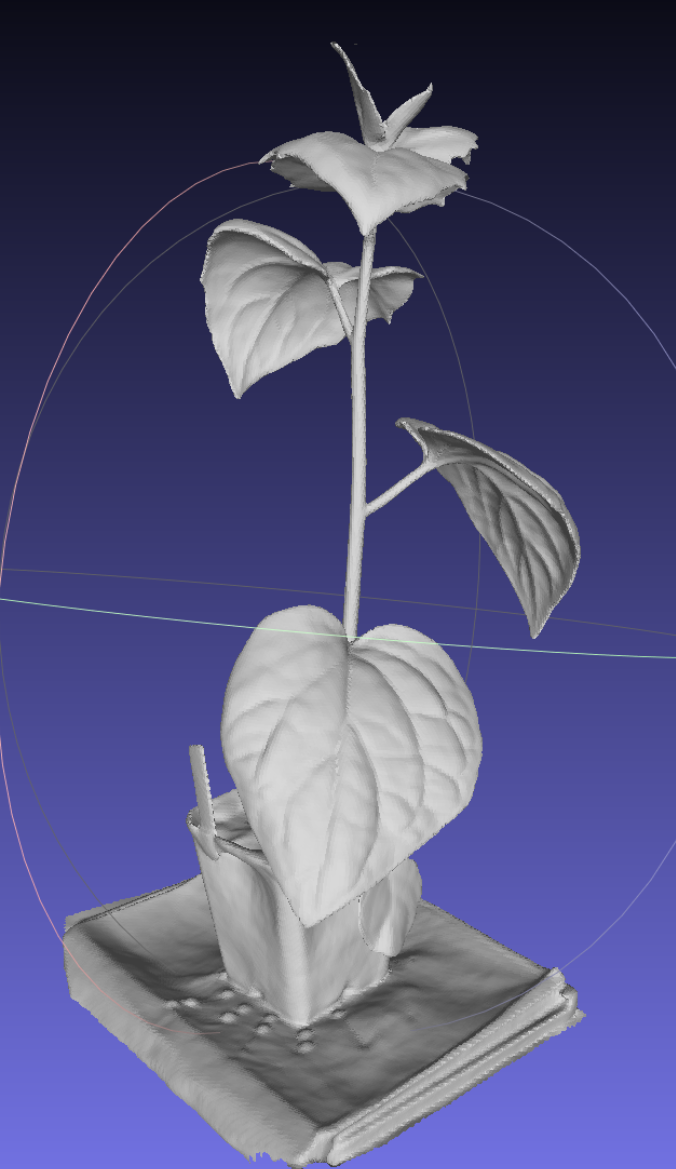
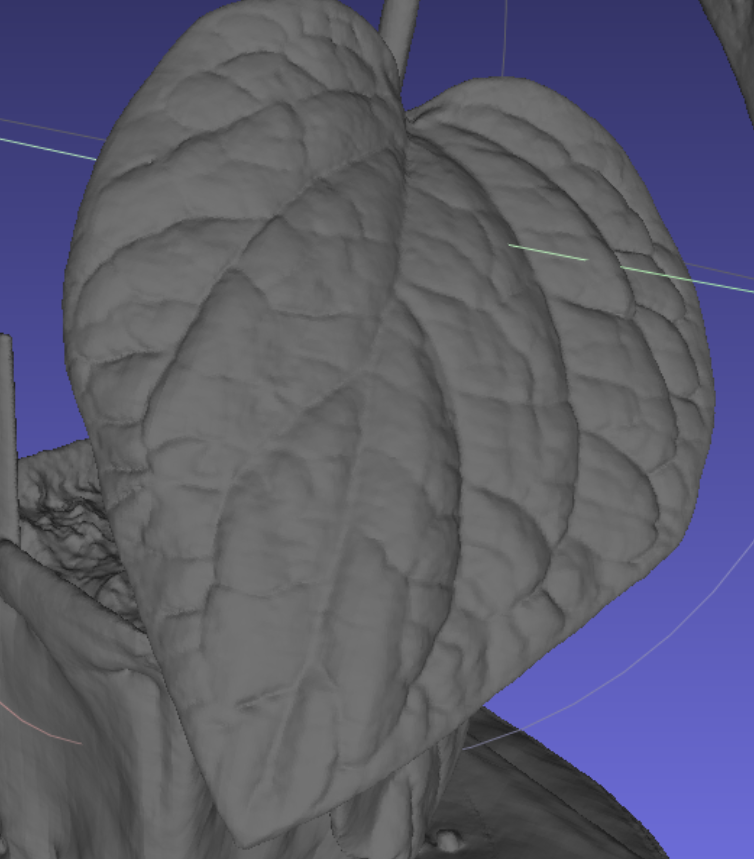
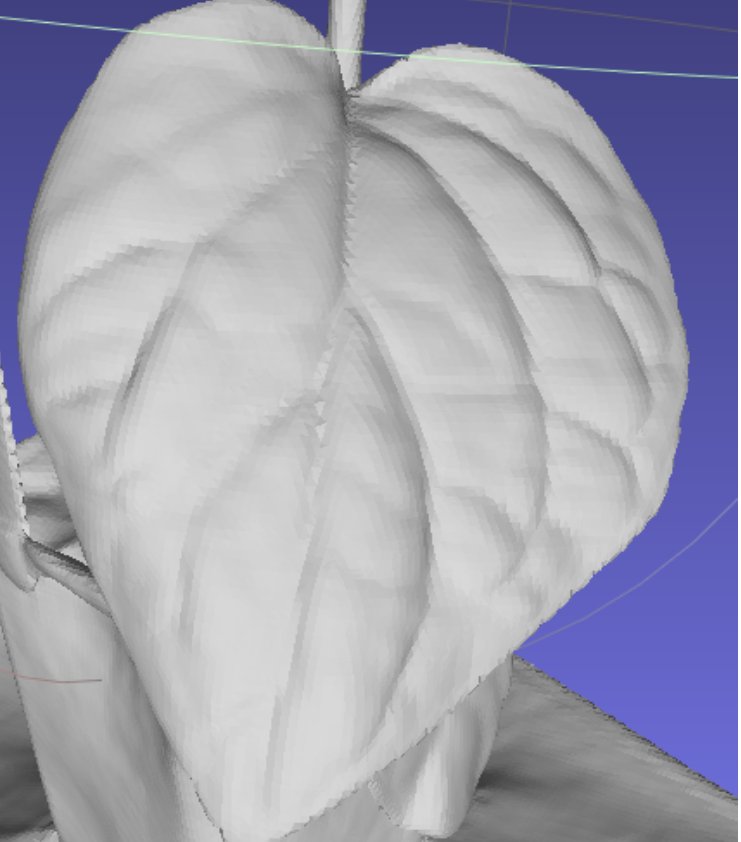
通过下述放大的叶片可以看出Neuralangelo重建的大叶植物的纹理比Neus重建的大叶植物纹理细致得多,那么再次证明Neuralangelo的纹理特征和几何质量比Neus好:
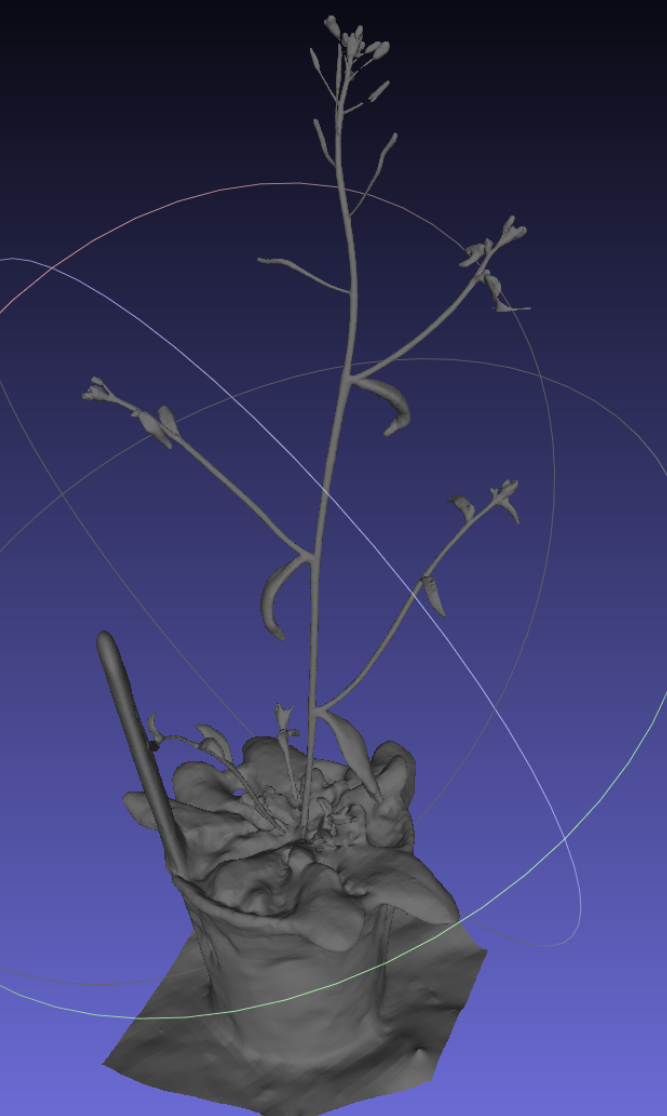
另外还在N3植物数据集上训练了Neuralangelo模型,下面是N3植物数据集提取的mesh:
下述是Neus跑的N3:
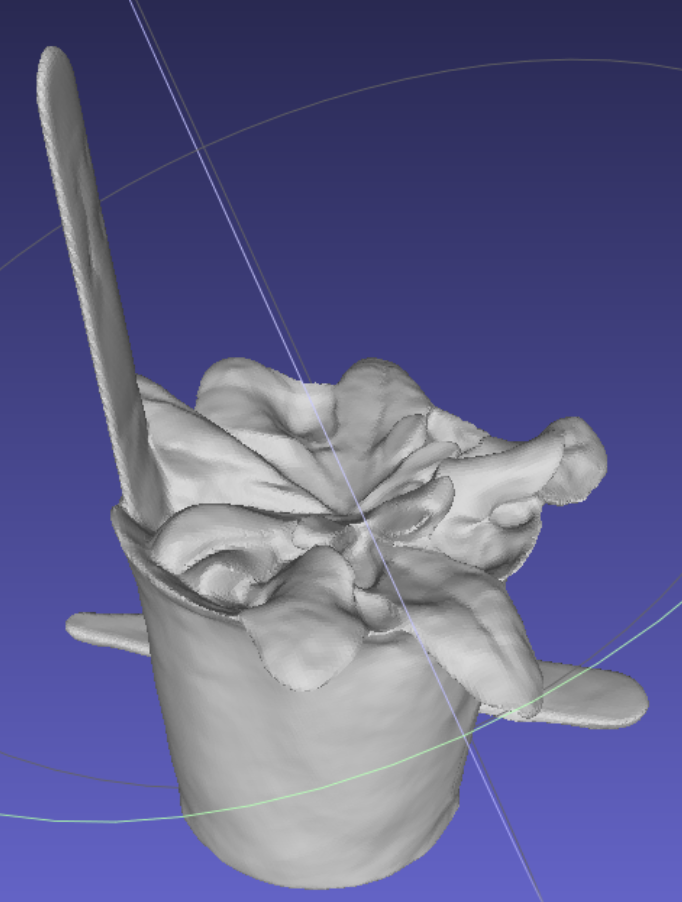
可以看出Neuralangelo居然把N3的植物枝干重建出来了,这是我没有想到的,我原本以为NeuralAngelo会和Neus一样重建不出来N3的枝干,因为之前做的表面重建方法中,只有有颜色的表面重建color-Neus和NeuralRecon-W才把N3的植物枝干重建出来了,其他表面重建的方法都没有成功,我就以为是因为采样点颜色输出一致帮助神经网络识别了几何的不同部分,从而提高了几何重建质量,才把N3的植物枝干重建出来的,由于Neuralangelo并不是有颜色的表面重建,也不存在采样点颜色输出一致,那么我自然就以为Neuralangelo不能重建出N3的植物枝干,但是Neuralangelo居然成功重建出了枝干,那么现在看来不止是采样点颜色输出一致可以帮忙重建出N3的植物枝干,Neuralangelo提出的两个创新数值梯度和渐进层次优化也可以帮忙重建出N3的枝干。
Neuralangelo提出的第一个创新数值梯度帮助全局表面都得到反向传播的优化,使得全局表面都变得比较光滑(DTU的63号场景的苹果没有那么凹陷,且表面更加平整光滑),第二个创新是通过对数值梯度的参数ϵ和哈希网格的分辨率进行渐进的优化,为的都是先识别出物体的整体形态(能够重建出植物枝干),然后在逐步细化,恢复出物体详细的纹理特征(N3底部枝干也能重建出来的原因),这两个创新极大的帮助了神经网络更好的识别物体表面的几何形态,进而提高重建的几何质量,使得N3的植物枝干能被完整的重建出来。
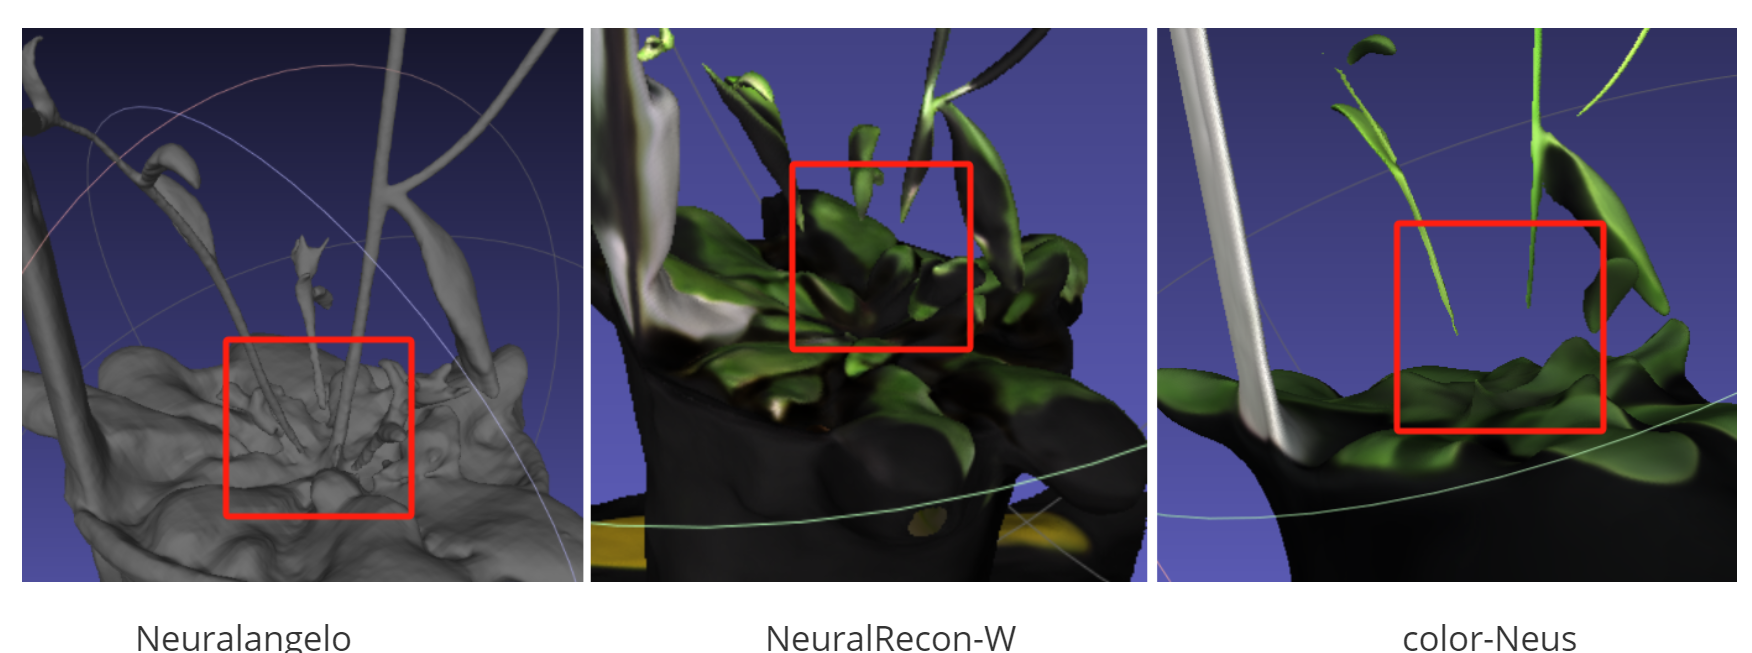
Neuralangelo NeuralRecon-W color-Neus
由上图可见Neuralangelo能够重建出N3植物底部的枝干,其重建物体的几何质量高于NeuralRecon-W和Color-Neus。我认为其原因是因为NeuralRecon-W和Color-Neus是因为采样点输出颜色一致来帮助神经网络识别N3的植物枝干,但是由于N3植物枝干的底部与位于花盆上叶片的绿色过于相近,因此不能通过采样点颜色一致来帮助神经网络识别出植物枝干底部,因此重建失败。那为什么Neuralangelo可以成功呢?因为Neuralangelo不是使用采样点颜色输出一致来提高重建的几何质量,我认为之所以能够重建出植物枝干的底部是因为Neuralanlo的第二个创新渐进层次优化,首先通过较大的数值梯度参数ϵ和较小的(粗糙的)哈希网格识别出重建物体的整体形态,粗糙的识别出物体的整体形态,植物枝干底部和花盆连成一坨,再用较小的数值梯度参数ϵ和较大的(细致的)哈希网格优化出重建物体的纹理特征,将植物枝干底部与花盆由一坨变得逐渐分离,形态分明。

脑启社区是一个专注类脑智能领域的开发者社区。欢迎加入社区,共建类脑智能生态。社区为开发者提供了丰富的开源类脑工具软件、类脑算法模型及数据集、类脑知识库、类脑技术培训课程以及类脑应用案例等资源。
更多推荐

 15
15 0
0- 0


 已为社区贡献3条内容

所有评论(0)